
If you’re struggling to optimize costs, ensure efficient resource utilization, and maintain scalability on your Kubernetes infrastructure, you should consider trying Amazon’s EKS Auto Mode. Introduced in December 2024, EKS Auto Mode was designed to automate cost optimization and simplify infrastructure management.
Enabling Auto Mode on your EKS clusters not only streamlines cluster operations but also continuously optimizes compute costs through intelligent capacity provisioning and dynamic scaling.
When enabled, EKS Auto Mode selects the ideal mix of EC2 instances, eliminates unused resources, and consolidates workloads, significantly reducing operational overhead. With support for cost-saving features like Spot Instances, Savings Plans, and Reserved Instances, EKS Auto Mode helps organizations improve Kubernetes cost efficiency.
In order to maximize cost-efficiency, you will need to carefully configure resource requests for each of the workloads deployed onto your cluster. Because EKS Auto Mode’s cost optimization features are powered by Karpenter, accurate workload-level resource requests are critical to provisioning the right EC2 instance types. Neglecting workload-level resource optimization risks continued overprovisioning of resources, poor cost control, and unpredictable application reliability.
To optimize your workload resource requests, you can use StormForge Optimize Live to automatically detect all Kubernetes workloads in your EKS Auto Mode cluster, continuously rightsizing workloads using machine learning and automation. These optimized resource requests are then used by EKS Auto Mode to provision the optimal EC2 instances to keep your costs under control and applications reliable.

Optimize Live is comprised of:
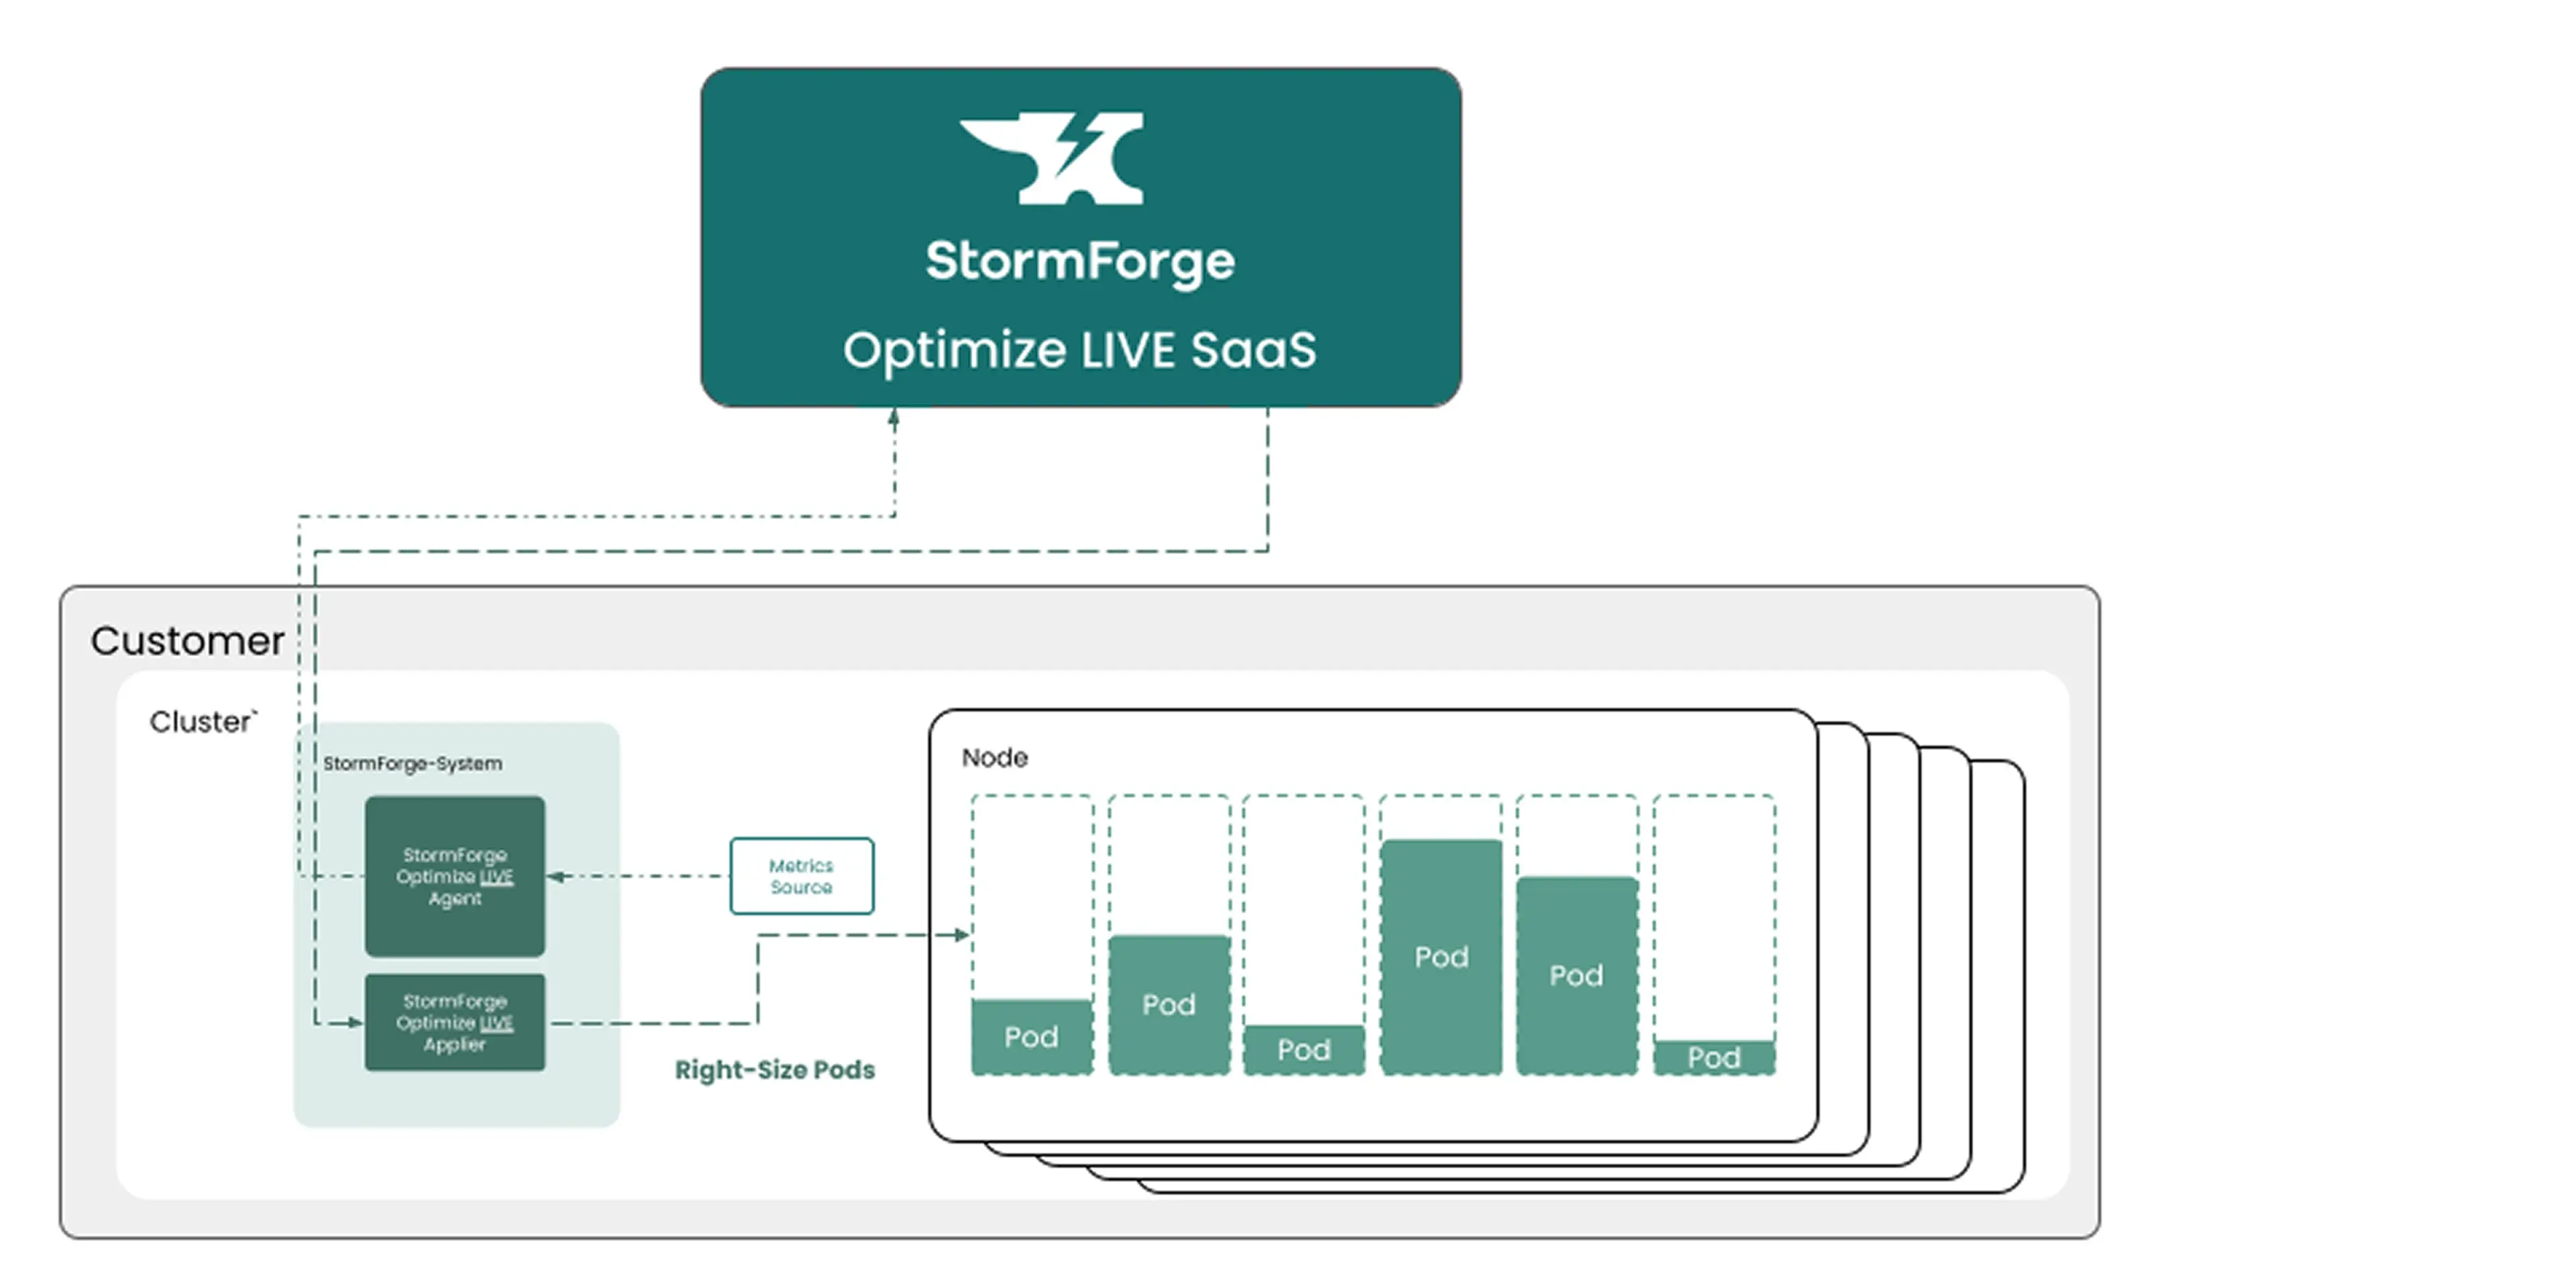
StormForge analyzes time-series metric data from your EKS Auto Mode cluster to rightsize workload resource requests. While the StormForge agent is lightweight and insensitive to the stops and starts that might occur as Auto Mode is continuously optimizing the underlying infrastructure, you should treat the StormForge agent as you would any other observability or cluster resource management agent.
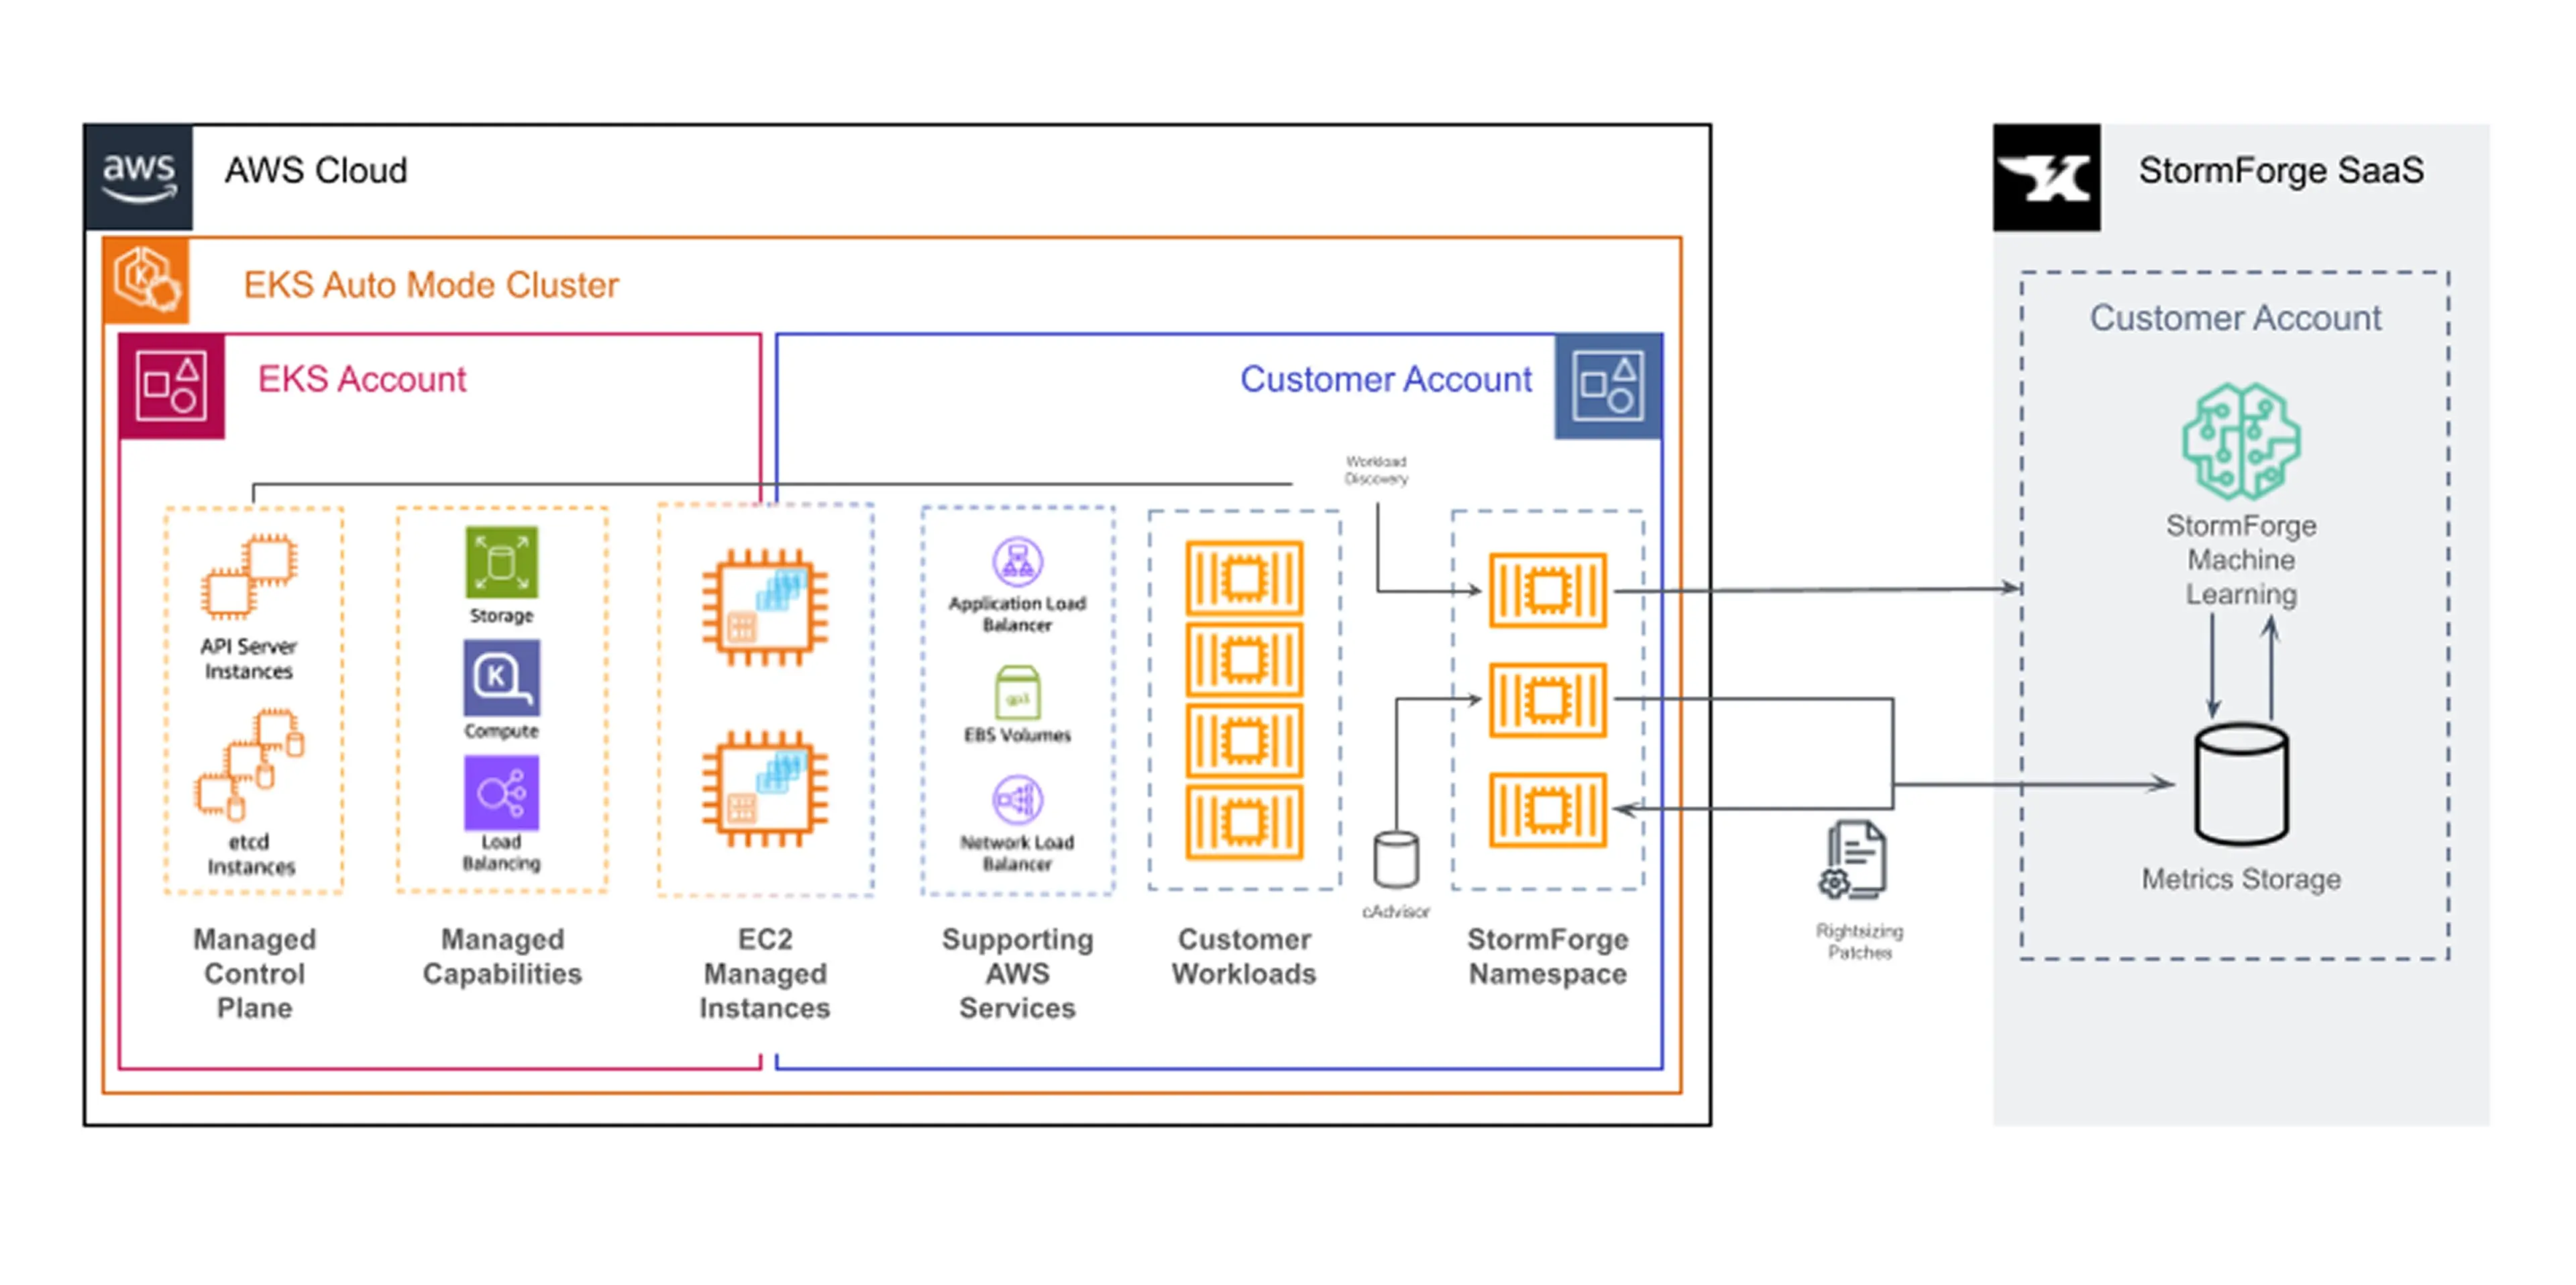
To ensure that the StormForge Agent runs without being impacted by the general application population, we recommend that you deploy the StormForge agent on to EKS Auto Mode’s default system nodepool, as depicted in the diagram below.
To modify the StormForge Agent to run on the system nodepool, you must first deploy it using the EKS add-on, or using Helm. The following will walk you through the steps for modifying the agent configuration for each option.
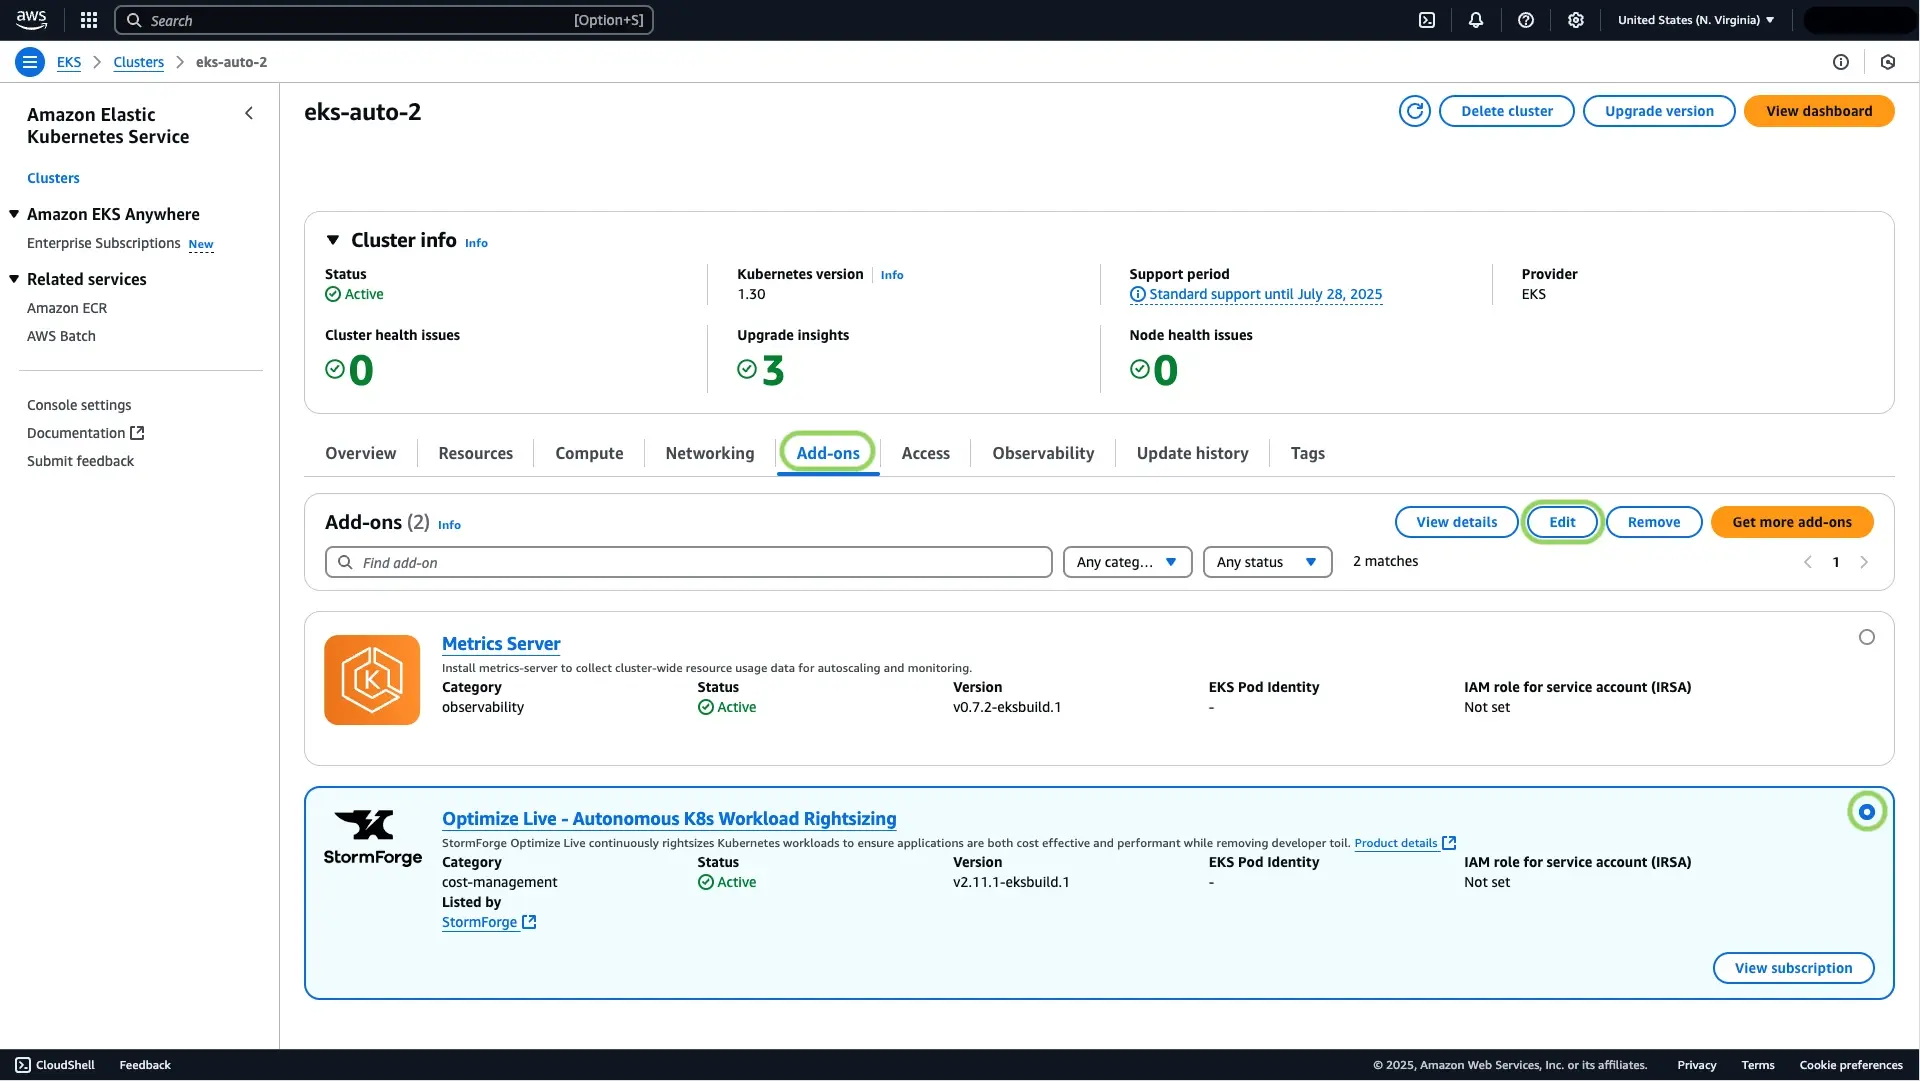
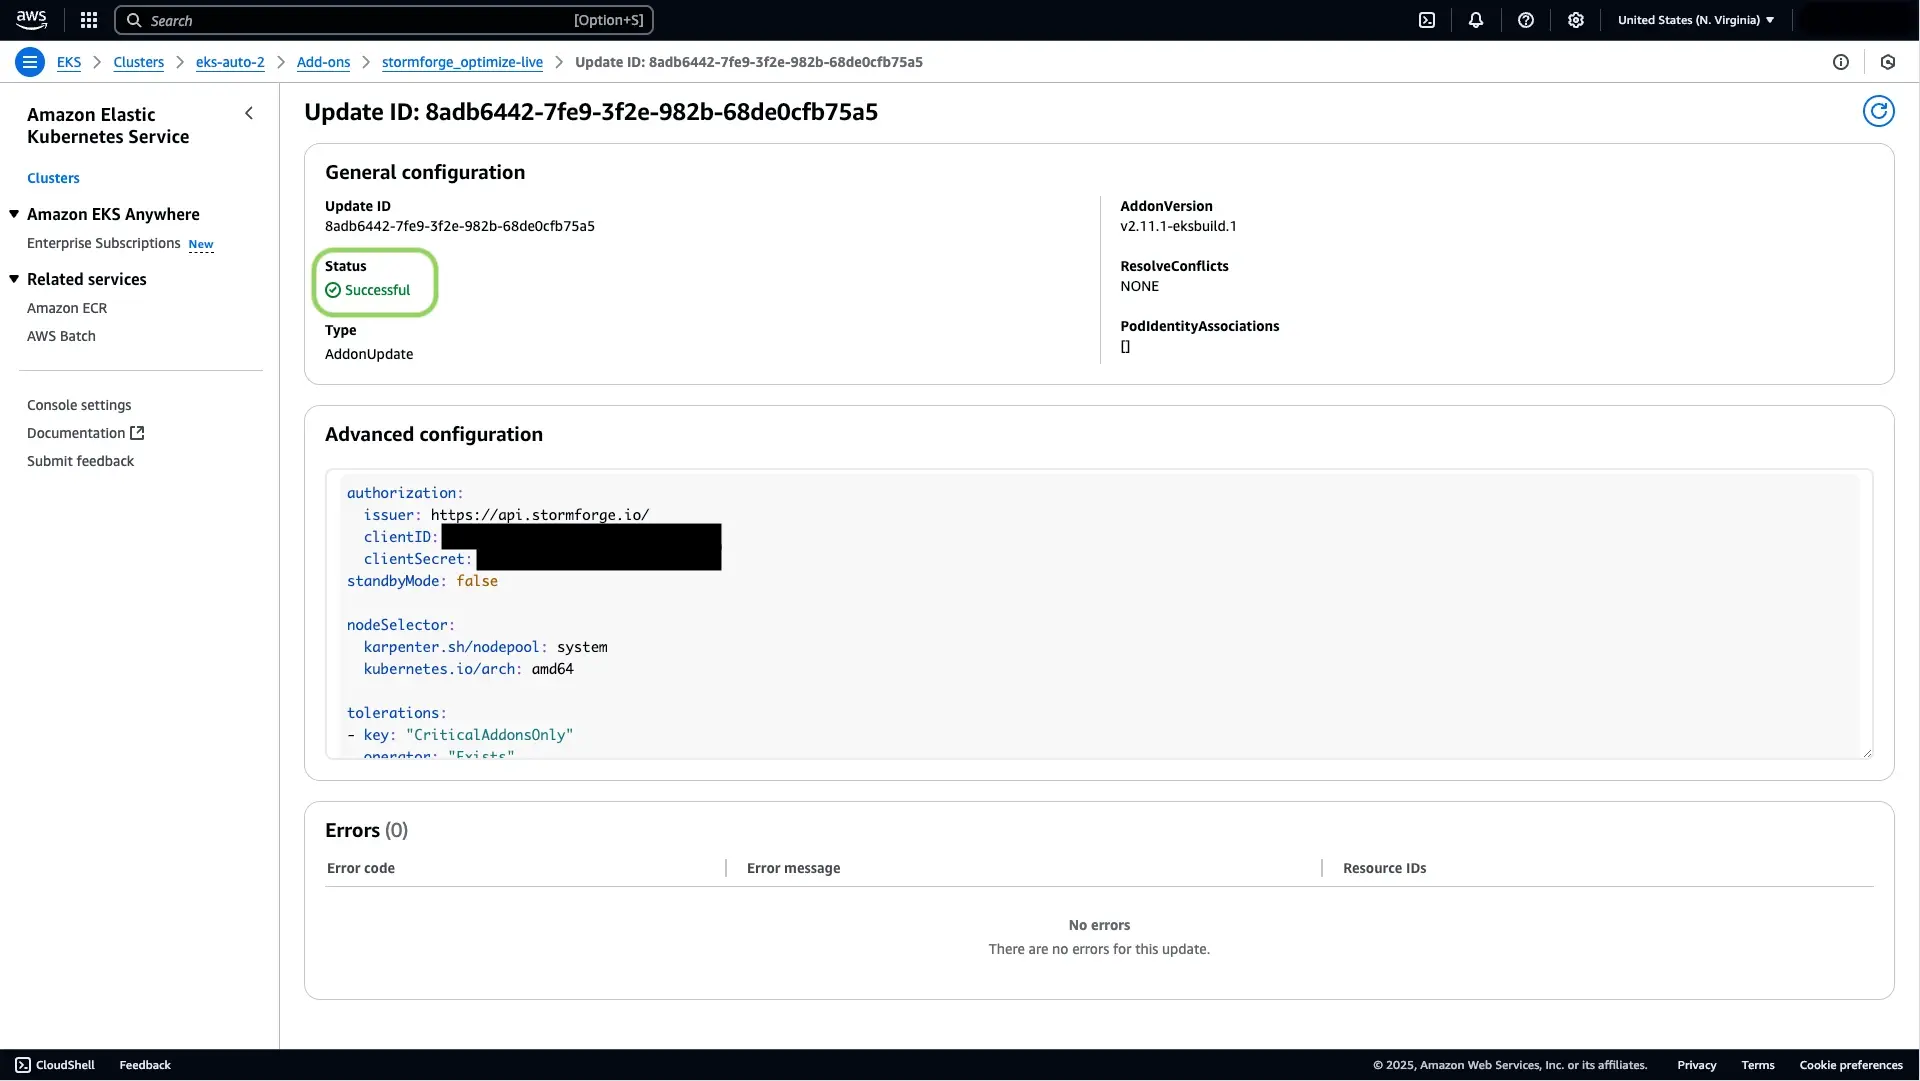
Access your EKS cluster control panel to locate and select the StormForge Add On, and click edit.
On the next page, click to expand Optional configuration settings and add the following YAML to the Configuration values field as shown below, and click Save changes.
nodeSelector:
  karpenter.sh/nodepool: system
  kubernetes.io/arch: amd64

tolerations:
 - key: "CriticalAddonsOnly"
   operator: "Exists"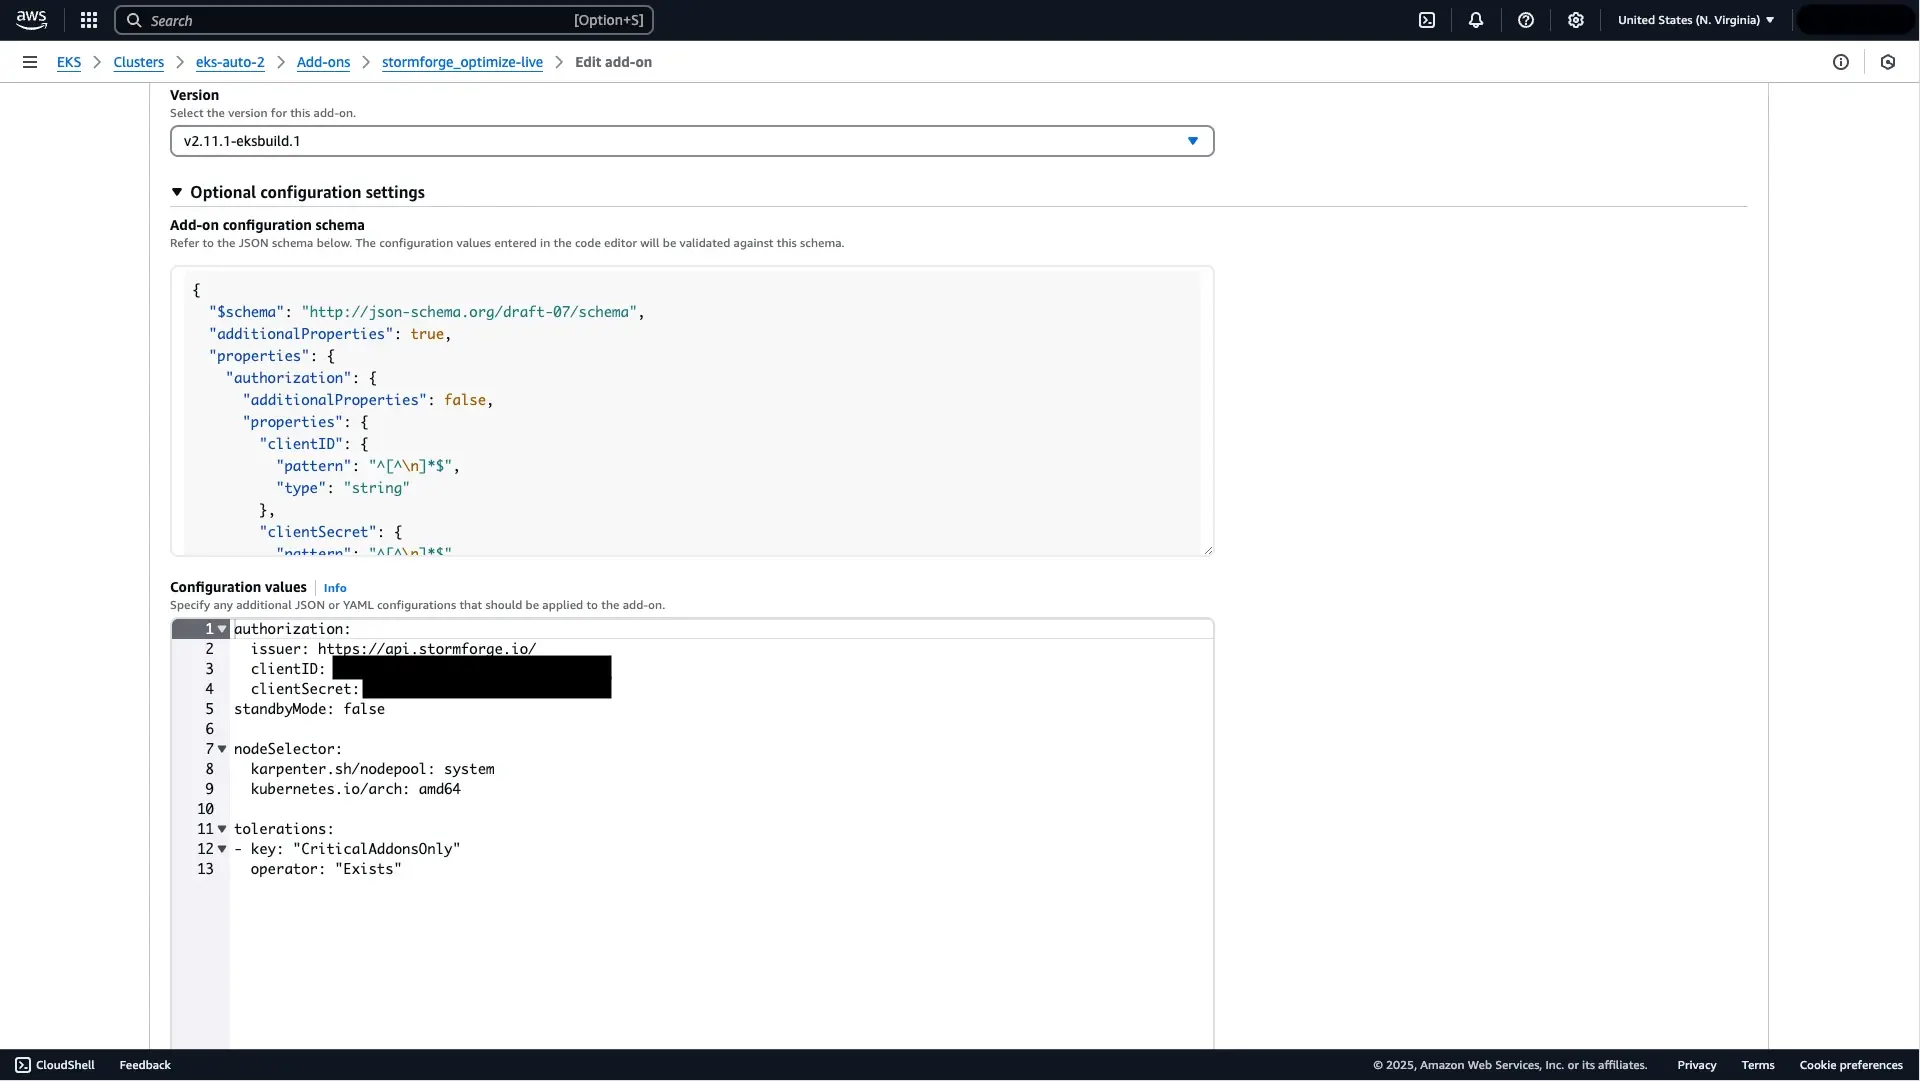
EKS will deploy the new changes to your cluster, updating the StormForge Agent configuration to run on the system nodepool.
You can confirm that the StormForge Agent is now running on the system nodepool by running the following command:
kubectl get pods -n stormforge-system -o custom-columns=NAME:.metadata.name,NODE:.spec.nodeName,NODEPOOL:.spec.nodeSelectorYou should get an output that looks similar to the below:
NAME                                                    NODE                  NODEPOOL
stormforge-agent-metrics-forwarder-5c5f668d47-8zxw5     i-02a9f939639e022e3   map[karpenter.sh/nodepool:system kubernetes.io/arch:amd64]
stormforge-agent-workload-controller-7ff6bdc8b9-gmcff   i-02a9f939639e022e3   map[karpenter.sh/nodepool:system kubernetes.io/arch:amd64]
Take the following steps to modify the existing Helm release and schedule the StormForge Agent on to the system nodepool.
Create a new YAML with the following contents:
# New values to schedule the StormForge Agent on to the default 'system' nodepool on EKS Auto Mode

nodeSelector:
  karpenter.sh/nodepool: system
  kubernetes.io/arch: amd64
tolerations:
- key: "CriticalAddonsOnly"
  operator: "Exists"
Save the file, and then run the following Helm command:
helm upgrade stormforge-agent -n stormforge-system oci://registry.stormforge.io/library/stormforge-agent --reset-then-reuse-values -f <path to YAML file>You can confirm that the StormForge Agent is now running on the system nodepool by running the following command:
kubectl get pods -n stormforge-system -o custom-columns=NAME:.metadata.name,NODE:.spec.nodeName,NODEPOOL:.spec.nodeSelectorYou should get an output that looks similar to below:
NAME                                                    NODE                  NODEPOOL
stormforge-agent-metrics-forwarder-785c47468c-57kc8    i-01c7a2b7ebd9f1431   map[karpenter.sh/nodepool:system kubernetes.io/arch:amd64]
stormforge-agent-workload-controller-fbcb56496-wdwk7 i-01c7a2b7ebd9f1431 map[karpenter.sh/nodepool:system kubernetes.io/arch:amd64]With the StormForge agent modified to run on the system Nodepool on EKS Auto Mode, you can quickly and easily rightsize all of your workloads autonomously.
To learn more about how to apply automatic continuous rightsizing of your workloads, visit our optimization settings documentation.
We use cookies to provide you with a better website experience and to analyze the site traffic. Please read our "privacy policy" for more information.