When it comes to proper resource optimization, you have to ask yourself four questions:
This is the definition of scaling up and down.
In this blog post, you’ll learn about two methods of ensuring proper resource optimization – Karpenter and StormForge Optimize Live.
When it comes to scaling up and scaling down, there are a few things that occur.
Your application stack asks for resources. Then, once it’s done with those resources, it (hopefully) gives the resource back and they get put into the pool. The resources are typically memory and CPU.
However, before that can occur, the resources need to be available. That’s where resource optimization for worker nodes comes into play. For the resources to be available, the worker nodes must have enough CPU and memory to give out. If there aren’t enough worker nodes, a new one comes online. Then, if the extra worker node isn’t needed, it goes away.
Scale up and scale down.
StormForge handles the first part (the application stack resources).
Karpenter handles the second part (scaling up and down worker nodes).
Together, you have proper resource optimization.
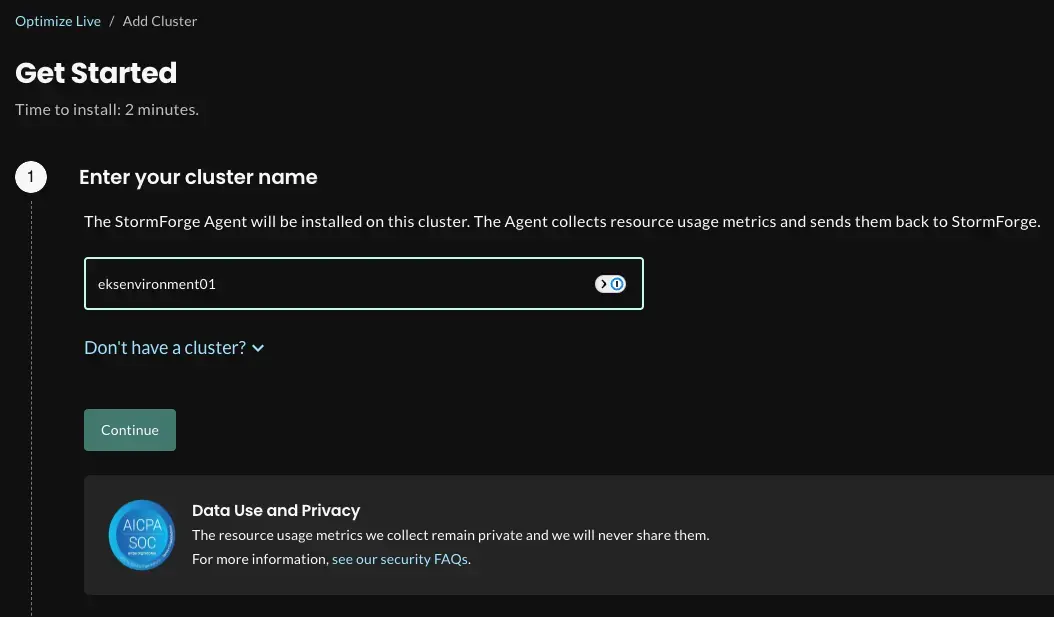
When you configure StormForge, it’s a two-prong approach. There’s a GUI piece and an installation piece. First, signup here with your email or via SSO.
The first screen will be to add a cluster. Type in your Kubernetes cluster name.
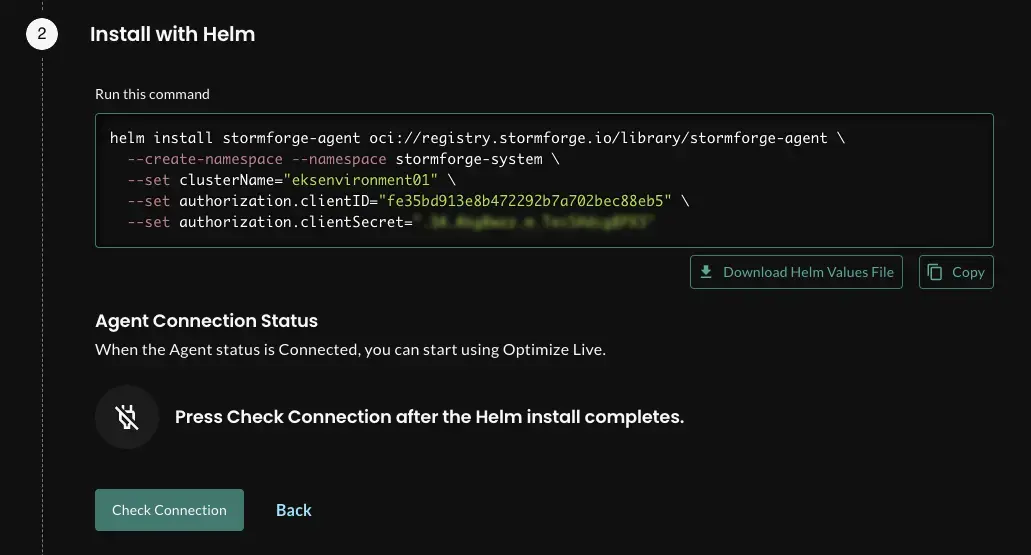
Next, download the values.yaml file that’s shown in the screenshot below, save it (or copy it), and run it. After you run the command, click the button to check the connection.
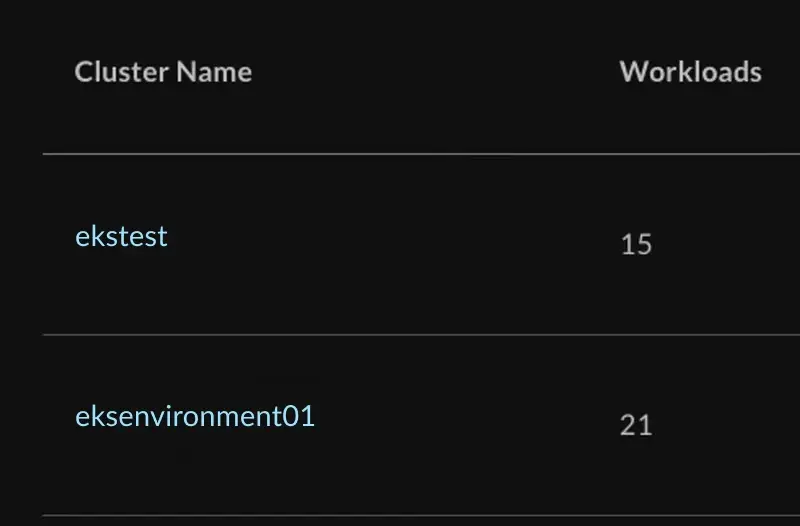
You should now see that your cluster exists.
StormForge now officially has access to ensuring that all resources are properly configured for your application stacks.
For the purposes of this blog post, you’ll see how Karpenter is configured using EKS. Karpenter is also now available in beta for AKS, so the process is different (you can watch a video about running Karpenter on AKS here).
In order to use this guide, you’ll need to:
By the end of this blog, you’ll have:
Let’s get started.
Using the following command, you’ll set a variable for your cluster name, along with other variables from your cluster configuration.
KARPENTER_NAMESPACE=kube-system
CLUSTER_NAME=<your cluster name>
AWS_REGION="$(aws configure list | grep region | tr -s " " | cut -d" " -f3)"
OIDC_ENDPOINT="$(aws eks describe-cluster --name "${CLUSTER_NAME}" \
    --query "cluster.identity.oidc.issuer" --output text)"
AWS_ACCOUNT_ID=$(aws sts get-caller-identity --query 'Account' \
    --output text)
K8S_VERSION=1.28
ARM_AMI_ID="$(aws ssm get-parameter --name /aws/service/eks/optimized-ami/${K8S_VERSION}/amazon-linux-2-arm64/recommended/image_id --query Parameter.Value --output text)"
AMD_AMI_ID="$(aws ssm get-parameter --name /aws/service/eks/optimized-ami/${K8S_VERSION}/amazon-linux-2/recommended/image_id --query Parameter.Value --output text)"
GPU_AMI_ID="$(aws ssm get-parameter --name /aws/service/eks/optimized-ami/${K8S_VERSION}/amazon-linux-2-gpu/recommended/image_id --query Parameter.Value --output text)"
With that information, you’ll create the IAM roles, inline policy, and trust relationship.
For Karpenter to work properly, you need two new IAM roles with the proper permissions (for nodes provisioned with Karpenter and the Karpenter controller).
To create the Karpenter node role, use the following policy and commands.
echo '{
    "Version": "2012-10-17",
    "Statement": [
        {
            "Effect": "Allow",
            "Principal": {
                "Service": "ec2.amazonaws.com"
            },
            "Action": "sts:AssumeRole"
        }
    ]
}' > node-trust-policy.json

aws iam create-role --role-name "KarpenterNodeRole-${CLUSTER_NAME}" \
    --assume-role-policy-document file://node-trust-policy.json
Now attach the required policies to the role.
aws iam attach-role-policy --role-name "KarpenterNodeRole-${CLUSTER_NAME}" \
    --policy-arn "arn:aws:iam::aws:policy/AmazonEKSWorkerNodePolicy"

aws iam attach-role-policy --role-name "KarpenterNodeRole-${CLUSTER_NAME}" \
    --policy-arn "arn:aws:iam::aws:policy/AmazonEKS_CNI_Policy"

aws iam attach-role-policy --role-name "KarpenterNodeRole-${CLUSTER_NAME}" \
    --policy-arn "arn:aws:iam::aws:policy/AmazonEC2ContainerRegistryReadOnly"

aws iam attach-role-policy --role-name "KarpenterNodeRole-${CLUSTER_NAME}" \
    --policy-arn "arn:aws:iam::aws:policy/AmazonSSMManagedInstanceCore"
Now you need to create an IAM role that the Karpenter controller will use to provision new instances. The controller will be using IAM Roles for Service Accounts (IRSA), which requires an OIDC endpoint.
Note: These steps will be different if you have another option for using IAM credentials with workloads (e.g. kube2iam).
cat << EOF > controller-trust-policy.json
{
    "Version": "2012-10-17",
    "Statement": [
        {
            "Effect": "Allow",
            "Principal": {
                "Federated": "arn:aws:iam::${AWS_ACCOUNT_ID}:oidc-provider/${OIDC_ENDPOINT#*//}"
            },
            "Action": "sts:AssumeRoleWithWebIdentity",
            "Condition": {
                "StringEquals": {
                    "${OIDC_ENDPOINT#*//}:aud": "sts.amazonaws.com",
                    "${OIDC_ENDPOINT#*//}:sub": "system:serviceaccount:${KARPENTER_NAMESPACE}:karpenter"
                }
            }
        }
    ]
}
EOF

aws iam create-role --role-name "KarpenterControllerRole-${CLUSTER_NAME}" \
    --assume-role-policy-document file://controller-trust-policy.json

cat << EOF > controller-policy.json
{
    "Statement": [
        {
            "Action": [
                "ssm:GetParameter",
                "ec2:DescribeImages",
                "ec2:RunInstances",
                "ec2:DescribeSubnets",
                "ec2:DescribeSecurityGroups",
                "ec2:DescribeLaunchTemplates",
                "ec2:DescribeInstances",
                "ec2:DescribeInstanceTypes",
                "ec2:DescribeInstanceTypeOfferings",
                "ec2:DeleteLaunchTemplate",
                "ec2:CreateTags",
                "ec2:CreateLaunchTemplate",
                "ec2:CreateFleet",
                "ec2:DescribeSpotPriceHistory",
                "pricing:GetProducts"
            ],
            "Effect": "Allow",
            "Resource": "*",
                        "Sid": "Karpenter"
        },
        {
            "Action": "ec2:TerminateInstances",
            "Condition": {
                "StringLike": {
                    "ec2:ResourceTag/karpenter.sh/nodepool": "*"
                }
            },
            "Effect": "Allow",
            "Resource": "*",
            "Sid": "ConditionalEC2Termination"
        },
        {
            "Effect": "Allow",
            "Action": "iam:PassRole",
            "Resource": "arn:aws:iam::${AWS_ACCOUNT_ID}:role/KarpenterNodeRole-${CLUSTER_NAME}",
            "Sid": "PassNodeIAMRole"
        },
        {
            "Effect": "Allow",
            "Action": "eks:DescribeCluster",
            "Resource": "arn:aws:eks:${AWS_REGION}:${AWS_ACCOUNT_ID}:cluster/${CLUSTER_NAME}",
            "Sid": "EKSClusterEndpointLookup"
        },
        {
            "Sid": "AllowScopedInstanceProfileCreationActions",
            "Effect": "Allow",
            "Resource": "*",
            "Action": [
            "iam:CreateInstanceProfile"
            ],
            "Condition": {
            "StringEquals": {
                "aws:RequestTag/kubernetes.io/cluster/${CLUSTER_NAME}": "owned",
                "aws:RequestTag/topology.kubernetes.io/region": "${AWS_REGION}"
            },
            "StringLike": {
                "aws:RequestTag/karpenter.k8s.aws/ec2nodeclass": "*"
            }
            }
        },
        {
            "Sid": "AllowScopedInstanceProfileTagActions",
            "Effect": "Allow",
            "Resource": "*",
            "Action": [
            "iam:TagInstanceProfile"
            ],
            "Condition": {
            "StringEquals": {
                "aws:ResourceTag/kubernetes.io/cluster/${CLUSTER_NAME}": "owned",
                "aws:ResourceTag/topology.kubernetes.io/region": "${AWS_REGION}",
                "aws:RequestTag/kubernetes.io/cluster/${CLUSTER_NAME}": "owned",
                "aws:RequestTag/topology.kubernetes.io/region": "${AWS_REGION}"
            },
            "StringLike": {
                "aws:ResourceTag/karpenter.k8s.aws/ec2nodeclass": "*",
                "aws:RequestTag/karpenter.k8s.aws/ec2nodeclass": "*"
            }
            }
        },
        {
            "Sid": "AllowScopedInstanceProfileActions",
            "Effect": "Allow",
            "Resource": "*",
            "Action": [
            "iam:AddRoleToInstanceProfile",
            "iam:RemoveRoleFromInstanceProfile",
            "iam:DeleteInstanceProfile"
            ],
            "Condition": {
            "StringEquals": {
                "aws:ResourceTag/kubernetes.io/cluster/${CLUSTER_NAME}": "owned",
                "aws:ResourceTag/topology.kubernetes.io/region": "${AWS_REGION}"
            },
            "StringLike": {
                "aws:ResourceTag/karpenter.k8s.aws/ec2nodeclass": "*"
            }
            }
        },
        {
            "Sid": "AllowInstanceProfileReadActions",
            "Effect": "Allow",
            "Resource": "*",
            "Action": "iam:GetInstanceProfile"
        }
    ],
    "Version": "2012-10-17"
}
EOF

aws iam put-role-policy --role-name "KarpenterControllerRole-${CLUSTER_NAME}" \
    --policy-name "KarpenterControllerPolicy-${CLUSTER_NAME}" \
--policy-document file://controller-policy.jsonIn order for Karpenter to know which subnets to use, you need to add tags to your nodegroup subnets.
for NODEGROUP in $(aws eks list-nodegroups --cluster-name "${CLUSTER_NAME}" --query 'nodegroups' --output text); do
    aws ec2 create-tags \
        --tags "Key=karpenter.sh/discovery,Value=${CLUSTER_NAME}" \
        --resources $(aws eks describe-nodegroup --cluster-name "${CLUSTER_NAME}" \
        --nodegroup-name "${NODEGROUP}" --query 'nodegroup.subnets' --output text )
done
Next, you’ll add tags to your security groups. This command only tags the security groups for the first nodegroup in the cluster. If you have multiple nodegroups or multiple security groups, you’ll need to decide which one Karpenter should use.
NODEGROUP=$(aws eks list-nodegroups --cluster-name "${CLUSTER_NAME}" \
    --query 'nodegroups[0]' --output text)

LAUNCH_TEMPLATE=$(aws eks describe-nodegroup --cluster-name "${CLUSTER_NAME}" \
    --nodegroup-name "${NODEGROUP}" --query 'nodegroup.launchTemplate.{id:id,version:version}' \
    --output text | tr -s "\t" ",")

# If your EKS setup is configured to use only Cluster security group, then please execute -

SECURITY_GROUPS=$(aws eks describe-cluster \
    --name "${CLUSTER_NAME}" --query "cluster.resourcesVpcConfig.clusterSecurityGroupId" --output text)

# If your setup uses the security groups in the Launch template of a managed node group, then :

SECURITY_GROUPS="$(aws ec2 describe-launch-template-versions \
    --launch-template-id "${LAUNCH_TEMPLATE%,*}" --versions "${LAUNCH_TEMPLATE#*,}" \
    --query 'LaunchTemplateVersions[0].LaunchTemplateData.[NetworkInterfaces[0].Groups||SecurityGroupIds]' \
    --output text)"

aws ec2 create-tags \
    --tags "Key=karpenter.sh/discovery,Value=${CLUSTER_NAME}" \
--resources "${SECURITY_GROUPS}"You need to allow nodes that are using the node IAM role that you just created to join the cluster. You’ll modify the aws-auth ConfigMap in the cluster to do so.
kubectl edit configmap aws-auth -n kube-systemNext, you need to add a section to the mapRoles that looks something like the command below, replacing the ${AWS_ACCOUNT_ID} variable with your account ID, and ${CLUSTER_NAME} variable with the cluster name. Do not replace the {{EC2PrivateDNSName}}.
- groups:
  - system:bootstrappers
  - system:nodes
  ## If you intend to run Windows workloads, the kube-proxy group should be specified.
  # For more information, see https://github.com/aws/karpenter/issues/5099.
  # - eks:kube-proxy-windows
  rolearn: arn:aws:iam::${AWS_ACCOUNT_ID}:role/KarpenterNodeRole-${CLUSTER_NAME}
  username: system:node:{{EC2PrivateDNSName}}
The full aws-auth configmap should have two groups: one for your Karpenter node role and one for your existing node group.
First, set the Karpenter release you want to deploy.
export KARPENTER_VERSION="1.1.1"You can now generate a full Karpenter deployment yaml from the Helm chart.
helm template karpenter oci://public.ecr.aws/karpenter/karpenter --version "${KARPENTER_VERSION}" --namespace "${KARPENTER_NAMESPACE}" \
    --set "settings.clusterName=${CLUSTER_NAME}" \
    --set "settings.interruptionQueue=${CLUSTER_NAME}" \
    --set "serviceAccount.annotations.eks\.amazonaws\.com/role-arn=arn:aws:iam::${AWS_ACCOUNT_ID}:role/KarpenterControllerRole-${CLUSTER_NAME}" \
    --set controller.resources.requests.cpu=1 \
    --set controller.resources.requests.memory=1Gi \
    --set controller.resources.limits.cpu=1 \
    --set controller.resources.limits.memory=1Gi > karpenter.yaml
Modify the following lines in the karpenter.yaml file.
Edit the karpenter.yaml file and find the Karpenter deployment affinity rules. Then, modify the affinity for Karpenter to run on just one of the existing node group nodes.
The rules should look something like the command below, modifying the value to match your $NODEGROUP, one node group per line.
affinity:
  nodeAffinity:
    requiredDuringSchedulingIgnoredDuringExecution:
      nodeSelectorTerms:
      - matchExpressions:
        - key: karpenter.sh/nodepool
          operator: DoesNotExist
        - key: eks.amazonaws.com/nodegroup
          operator: In
          values:
          - ${NODEGROUP}
  podAntiAffinity:
    requiredDuringSchedulingIgnoredDuringExecution:
      - topologyKey: "kubernetes.io/hostname"
Now that your deployment is ready, you can create the Karpenter namespace, create the NodePool CRD, and then deploy the rest of the Karpenter resources.
kubectl create namespace "${KARPENTER_NAMESPACE}" || true
kubectl create -f \
    "https://raw.githubusercontent.com/aws/karpenter-provider-aws/v${KARPENTER_VERSION}/pkg/apis/crds/karpenter.sh_nodepools.yaml"
kubectl create -f \
    "https://raw.githubusercontent.com/aws/karpenter-provider-aws/v${KARPENTER_VERSION}/pkg/apis/crds/karpenter.k8s.aws_ec2nodeclasses.yaml"
kubectl create -f \
    "https://raw.githubusercontent.com/aws/karpenter-provider-aws/v${KARPENTER_VERSION}/pkg/apis/crds/karpenter.sh_nodeclaims.yaml"
kubectl apply -f karpenter.yamlIn order for Karpenter to understand what types of nodes you want for unscheduled workloads, you need to create a default NodePool. You can look through these NodePool examples to meet your specific needs.
cat <<EOF | envsubst | kubectl apply -f -
apiVersion: karpenter.sh/v1
kind: NodePool
metadata:
  name: default
spec:
  template:
    spec:
      requirements:
        - key: kubernetes.io/arch
          operator: In
          values: ["amd64"]
        - key: kubernetes.io/os
          operator: In
          values: ["linux"]
        - key: karpenter.sh/capacity-type
          operator: In
          values: ["spot"]
        - key: karpenter.k8s.aws/instance-category
          operator: In
          values: ["c", "m", "r"]
        - key: karpenter.k8s.aws/instance-generation
          operator: Gt
          values: ["2"]
      nodeClassRef:
        group: karpenter.k8s.aws
        kind: EC2NodeClass
        name: default
      expireAfter: 720h # 30 * 24h = 720h
  limits:
    cpu: 1000
  disruption:
    consolidationPolicy: WhenEmptyOrUnderutilized
    consolidateAfter: 1m
---
apiVersion: karpenter.k8s.aws/v1
kind: EC2NodeClass
metadata:
  name: default
spec:
  amiFamily: AL2 # Amazon Linux 2
  role: "KarpenterNodeRole-${CLUSTER_NAME}" # replace with your cluster name
  subnetSelectorTerms:
    - tags:
        karpenter.sh/discovery: "${CLUSTER_NAME}" # replace with your cluster name
  securityGroupSelectorTerms:
    - tags:
        karpenter.sh/discovery: "${CLUSTER_NAME}" # replace with your cluster name
  amiSelectorTerms:
    - id: "${ARM_AMI_ID}"
    - id: "${AMD_AMI_ID}"
#   - id: "${GPU_AMI_ID}" # <- GPU Optimized AMD AMI
#   - name: "amazon-eks-node-${K8S_VERSION}-*" # <- automatically upgrade when a new AL2 EKS Optimized AMI is released. This is unsafe for production workloads. Validate AMIs in lower environments before deploying them to production.
EOFIf you’re using the cluster autoscaler, you can disable it now that Karpenter is running. You will scale the number of replicas to zero in order to do so.
kubectl scale deploy/cluster-autoscaler -n kube-system --replicas=0To remove the instances that were added from the node group, you can scale your nodegroup down to a minimum size to support Karpenter and other critical services.
Note: If your workloads do not have pod disruption budgets set, the following command will cause workloads to be unavailable.
If you have a single multi-AZ node group, the Karpenter docs suggest a minimum of 2 instances.
aws eks update-nodegroup-config --cluster-name "${CLUSTER_NAME}" \
    --nodegroup-name "${NODEGROUP}" \
    --scaling-config "minSize=2,maxSize=2,desiredSize=2"
Alternatively, if you have multiple single-AZ node groups, they suggest a minimum of 1 instance each.
for NODEGROUP in $(aws eks list-nodegroups --cluster-name "${CLUSTER_NAME}" \
    --query 'nodegroups' --output text); do aws eks update-nodegroup-config --cluster-name "${CLUSTER_NAME}" \
    --nodegroup-name "${NODEGROUP}" \
    --scaling-config "minSize=1,maxSize=1,desiredSize=1"
done
Note: If you have a lot of nodes or workloads, you might opt to slowly scale down your node groups a few instances at a time. Be sure to watch the transition carefully for workloads that may not have enough replicas running or disruption budgets configured.
As nodegroup nodes are drained, you can verify that Karpenter is creating nodes for your workloads.
kubectl logs -f -n karpenter -c controller -l app.kubernetes.io/name=karpenterYou should also see new nodes created in your cluster as the old nodes are removed.
kubectl get nodesCongrats! You have successfully installed and configured Karpenter alongside StormForge, ensuring that both your application stack and worker nodes have enough resources. This is the make-or-break between costs being incredibly high or an application running properly for users.
We use cookies to provide you with a better website experience and to analyze the site traffic. Please read our "privacy policy" for more information.