One of the new combinations in resource optimization and Kubernetes enablement is the ability to use Karpenter on Azure Kubernetes Service (AKS). Although still in beta, this ability will open up several options from a performance optimization perspective for all clusters.
In this blog post, you’ll learn how to set up Karpenter on AKS along with StormForge.
To follow along with this blog post in a hands-on fashion, you should have the following:
Originally, Karpenter was an open-source project from AWS, and when I say originally, I mean until only about 2-3 months ago.
Karpenter opened up a lot of doors in terms of performance optimization for clusters. When it comes to scaling up Worker Nodes when workloads need more resources and scaling them down as soon as the workloads are done using said resources, Karpenter is the most performant compared to other solutions like Cluster Autoscaler.
Because of the reputation that Karpenter has of being the fastest cluster autoscaler out right now, there was a major question – “Why isn’t it available on AKS?” and with that question, a Git issue emerged.
There were several engineers requesting the ability to use Karpenter on AKS and originally, it was a hard “no”. After a lot of back and forth, it was decided that Karpenter would be modified in a way to work on AKS.
So, why did this happen? It’s not that another cluster autoscaler couldn’t be created, so why do this with Karpenter? My bet is on the reputation that Karpenter created for itself. It’s well-known and everyone likes using it, so it only makes sense that engineers were inclined to ask for it on the AKS side.
At the time of writing this, there are a few limitations (per the docs here: https://learn.microsoft.com/en-gb/azure/aks/node-autoprovision?tabs=azure-cli):
As it stands at the time of writing this blog post (2/2024), Karpenter for AKS is still in preview. Specifically, it’s in v1 Alpha. Now, take that with a grain of salt because ArgoCD’s Controllers are technically still in “Alpha”, but they’re being used in production. However, Microsoft is pretty good about telling people when they feel a product is production-ready.
One other thing to keep in mind is that Karpenter on AKS, at this time, is only available via an addon. That means it’s not available for general installation use.
For example, you can still Karpenter on EKS with the Helm Chart below:
helm upgrade --install --namespace karpenter --create-namespace \
karpenter karpenter/karpenter \
--set serviceAccount.annotations."eks\.amazonaws\.com/role-arn"=${KARPENTER_IAM_ROLE_ARN} \
--set clusterName=${CLUSTER_NAME} \
--set clusterEndpoint=${CLUSTER_ENDPOINT} \
--set aws.defaultInstanceProfile=KarpenterNodeInstanceProfile-${CLUSTER_NAME}
This is the “self-hosted” version.
On AKS, you cannot use the self-hosted version yet, but the Git page states that it’s in the works.
In the two sections below, you’ll see two methods for getting your cluster ready for Karpenter with Terraform and the Azure CLI.
For both methods below, you’ll need to enable the add-on for Node Autoprovisioning (which is managed Karpenter).
First, ensure that you have the AKS Preview extension add.
az extension add --name aks-preview
Next, register the NodeAutoProvisioningPreview(managed Karpenter).
az feature register --namespace "Microsoft.ContainerService" --name "NodeAutoProvisioningPreview"
To ensure that it was registered appropriately on your cluster, run the show command to see the status.
az feature show --namespace "Microsoft.ContainerService" --name "NodeAutoProvisioningPreview"
Register it on your cluster.
az provider register --namespace Microsoft.ContainerService
With any repeatable solution, chances are you’ll want to use Infrastructure-as-Code (IAC) to deploy any type of infrastructure, including Kubernetes clusters.
If you decide to go with Terraform, the following configuration will get you to the end goal.
First, ensure that the proper Azure provider is in place.
terraform {
  required_providers {
    azurerm = {
      source  = "hashicorp/azurerm"
      version = ">= 3.0.0"
    }
  }
}

provider "azurerm" {
  features {}
}
Next, configure the AKS Terraform resource. Notice how within this resource there’s a network profile that consists of Azure as the plugin and Cilium as the policy – this is mandatory.
resource "azurerm_kubernetes_cluster" "k8squickstart" {
  name                = var.name
  location            = var.location
  resource_group_name = var.resource_group_name
  dns_prefix          = "${var.name}-dns01"

  network_profile {
  network_plugin = "azure"
  network_policy = "cilium"
}
Add an appropriate node pool for your Worker Nodes.
  default_node_pool {
    name       = "default"
    node_count = var.node_count
    vm_size    = "Standard_A2_v2"
  }
Ensure proper identity verification and tags.
  identity {
    type = "SystemAssigned"
  }

  tags = {
    Environment = "Production"
  }
}
Once the cluster is up and running, you’ll need to use the Azure CLI to enable overlay mode and Node Provisioning (managed Karpenter). At this time, there’s not a way to do it in Terraform.
az aks upgrade --resource-group myResourceGroup \
--name myAKSCluster \
--node-provisioning-mode Auto \
--network-plugin-mode overlay
Another option, although imperative, would be to use the Azure CLI to create the Kubernetes cluster and enable the necessary addons needed to run Karpenter.
Below is an example. It does everything that the Terraform configuration above does in terms of creating the cluster, enabling Cilium, and adding Azure as the plugin.
az aks create --name your_cluster_name \
--resource-group your_rg_name \
--node-provisioning-mode Auto \
--network-plugin azure \
--network-plugin-mode overlay \
--network-dataplane cilium
Now that Karpenter is configured as a managed add-on via AKS, you can utilize it for Worker Node scaling.
From a workload (like Pods) autoscaling perspective, you’ll want to use StormForge. Both Karpenter and Stormforge combined ensure proper performance optimization for workloads and Worker Nodes.
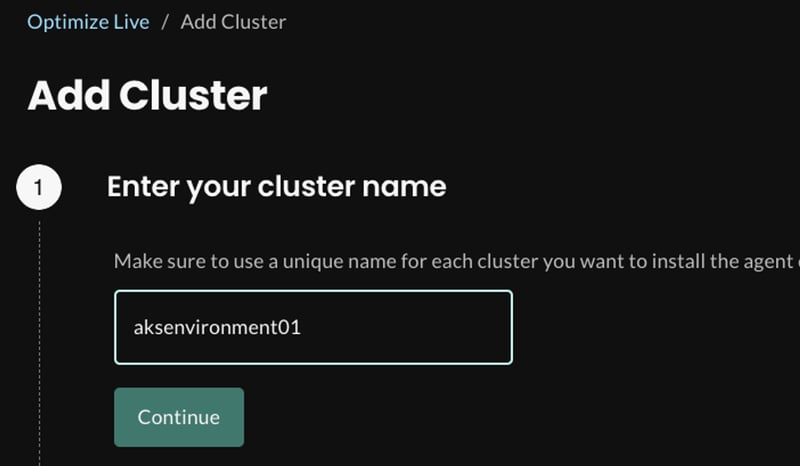
Log into your StormForge account, go to clusters, and click the + Add Cluster button. You’ll be brought to a screen similar to the screenshot below.
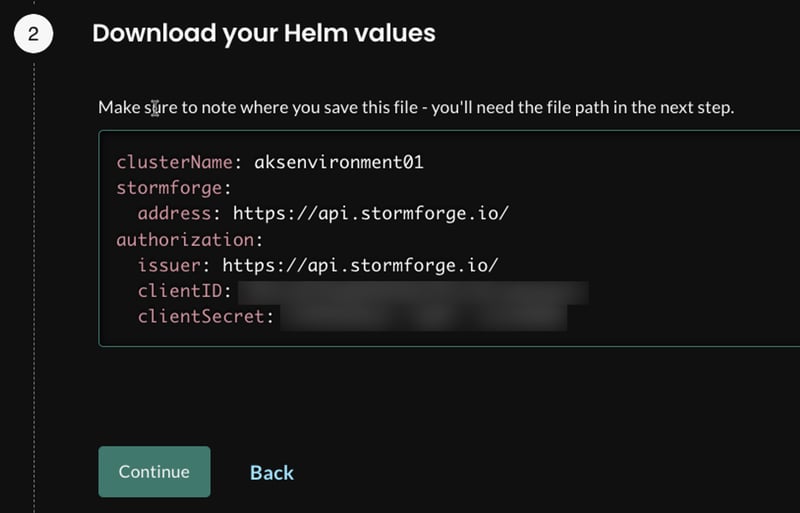
For StormForge to have the proper permissions to manage your workloads, run the Helm configuration with the value.yaml that’s displayed on your screen.
Install the StormForge Agent.
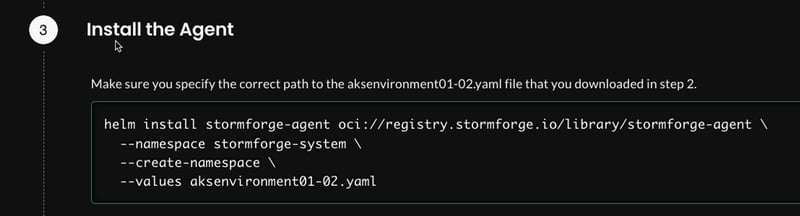
Give the installation 1 minute and then verify the install.

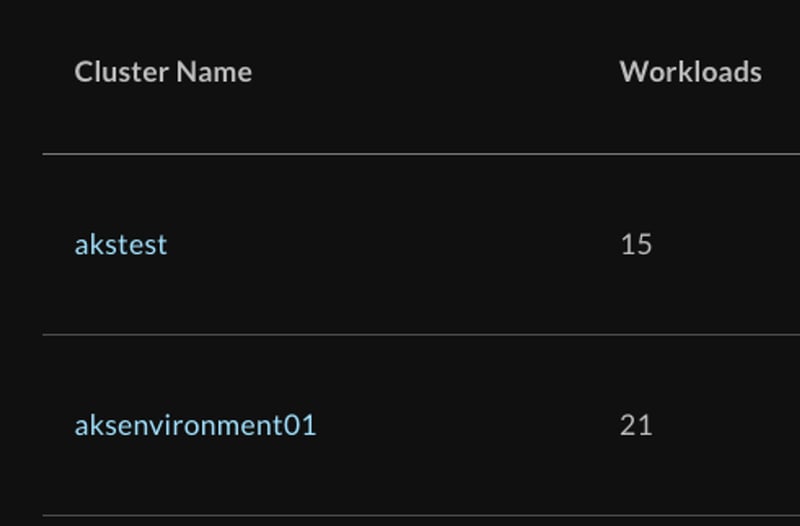
You’ll now see the cluster on the StormForge dashboard.
Get up, grab a coffee, maybe a snack, and let StormForge take a look at your environment for about an hour or so.
StormForge will look over your environment and get a preliminary checklist of what it can modify and where it can help, but it does take a full 7 days for StormForge to fully understand the workloads and where they can be optimized.
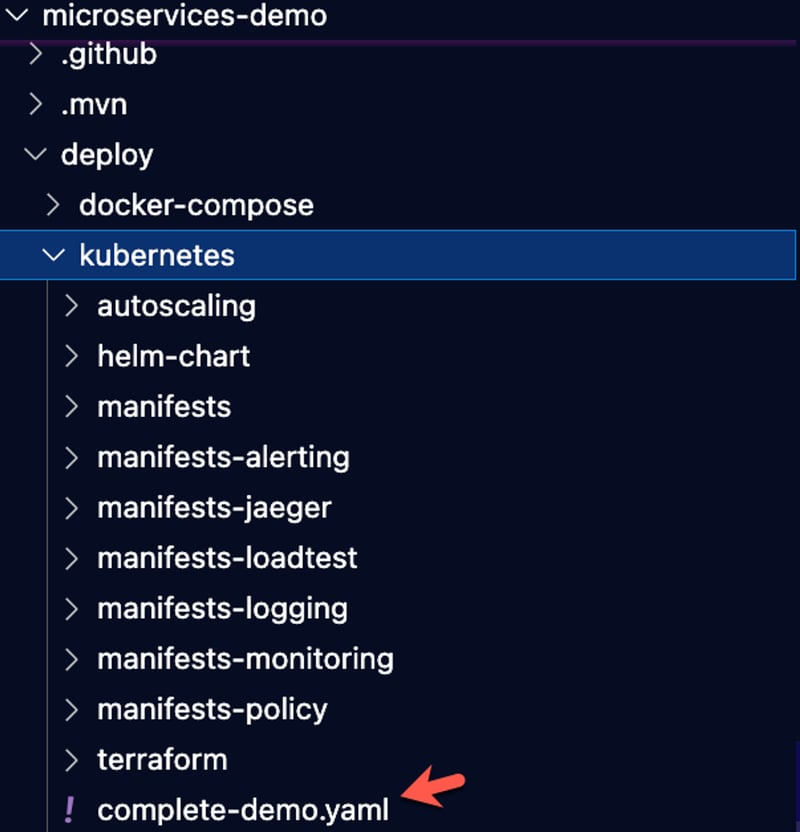
To test out a workload configuration, clone the following demo application: https://github.com/microservices-demo/microservices-demo
Once cloned, cd into deploy > kubernetes.
Run the complete-demo.yaml Manifest.
kubectl apply -f complete-demo.yaml
You’ll see an output similar to the one below.
namespace/sock-shop created
Warning: spec.template.spec.nodeSelector[beta.kubernetes.io/os]: deprecated since v1.14; use "kubernetes.io/os" instead
deployment.apps/carts created
service/carts created
deployment.apps/carts-db created
service/carts-db created
deployment.apps/catalogue created
service/catalogue created
deployment.apps/catalogue-db created
service/catalogue-db created
deployment.apps/front-end created
service/front-end created
deployment.apps/orders created
service/orders created
deployment.apps/orders-db created
service/orders-db created
deployment.apps/payment created
service/payment created
deployment.apps/queue-master created
service/queue-master created
deployment.apps/rabbitmq created
service/rabbitmq created
deployment.apps/session-db created
service/session-db created
deployment.apps/shipping created
service/shipping created
deployment.apps/user created
service/user created
deployment.apps/user-db created
service/user-db created
You’ll see that StormForge is in the “learning” stage of figuring out how it can help optimize your environment.
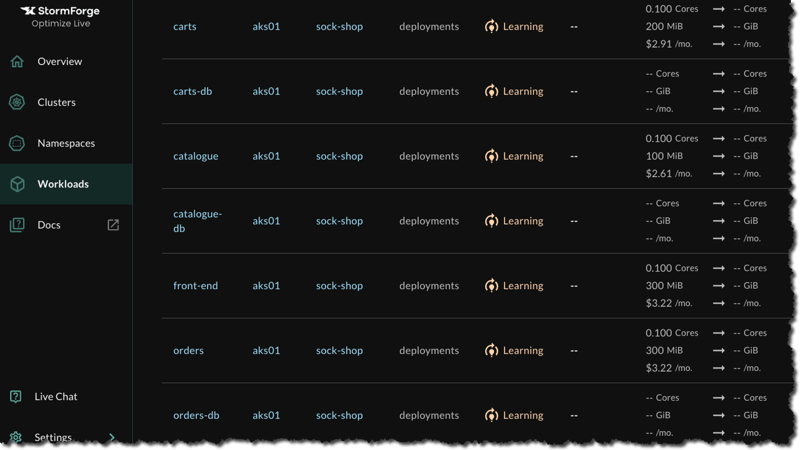
After the learning is complete, you’ll be able to see some preliminary suggestions for your workloads. For example, if you click on the carts workload, you’ll see a screen similar to the one below.
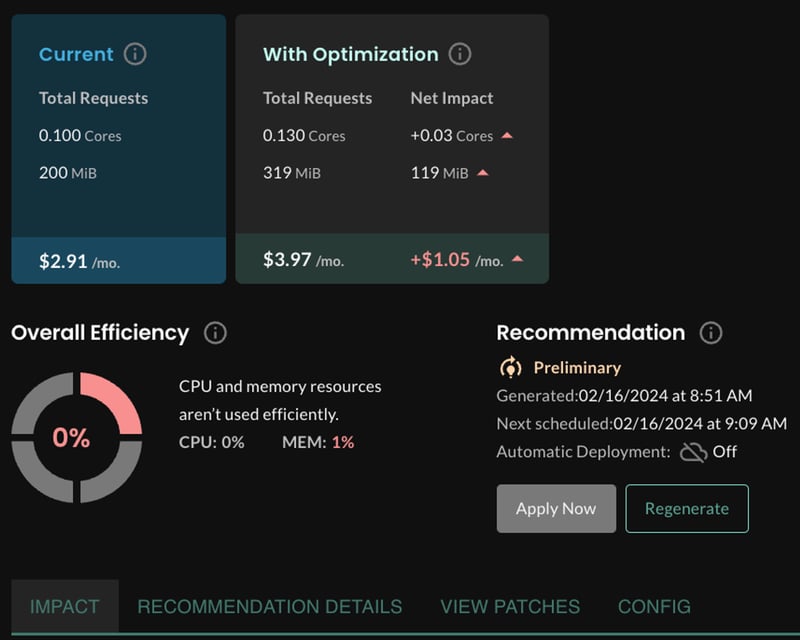
Please note that recommendations are all based on monitoring the usage patterns of the workload itself.
We use cookies to provide you with a better website experience and to analyze the site traffic. Please read our "privacy policy" for more information.