Chapter 3 - How Kubernetes Memory Requests and Limits Actually Work
Chapter 3 of a wizard's journey through the technical inner workings of Kubernetes resource management
Understanding the mysterious inner workings of Kubernetes resource management at a deep level can make you feel like a wizard. As detailed in the first chapter in this series, becoming a wizard of Kubernetes resource management involves achieving an end-to-end contextual understanding of how resource management functions in Kubernetes, including everything from its user abstractions to technical implementation at the Linux kernel level.
In Chapter 1 of this series, we detailed how pod spec and node status are used to make matches between pending pods and available nodes. In Chapter 2, we delved deep into how requests and limits are converted to Linux cgroup settings for CPU, and what that means for performance and reliability outcomes. Chapter 3 resumes by entering a final deep dive into memory, with the goal of exposing what memory requests and limits turn into at the Linux level, understanding how that conversion is performed and learning what it means in terms of anticipating, predicting or guaranteeing memory resource outcomes.
The Journey Resumes #
Kubernetes pods get scheduled on nodes purely based on their requests. Node “fullness” is request-based, ignoring usage and limits. Cgroups are used to impose constraints and blessings on processes, and they have layers. Kubernetes sets up cgroups with layers from Kubepods => (QoS level)? => pod => container. Based on a conversion from CPU requests and limits, each cgroup gets a value for cpu.weight and/or cpu.max settings. Fastest. Recap. Ever. 🏁
Now let’s reset, pivot and this time focus on memory.
Cgroups really seem like they’re where it’s at based on what we learned about how CPU requests and limits are implemented. What affordances does Kubernetes make for memory in terms of cgroups?
For memory resources:

Aaaaand something seems to be missing here. There’s no cgroup setting corresponding to the memory request abstraction. We learned last time that a CPU request is a guarantee that if the process wants that much CPU, it gets it. Can Kubernetes match that guarantee with memory and ensure that for whatever memory a workload requests, it gets?
Note: There are two versions of the cgroup API in common use. The remainder of this article will refer only to the cgroup v2 setting names for simplicity. Use of the v1 implementation has functionally equivalent outcomes.
Memory is Do Or Die #
Something critical to know up front about the memory resource, which is different from CPU, is that memory is not a compressible resource.
CPU time can be withheld or deferred without terminating the process, though doing so might hurt performance. Not so for memory. You either get it or you don’t. There is no try, and there is no defer. If a process needs more memory, either more memory will be granted, or the process will be terminated. Yeah, Kubernetes will restart it, but damage may already be done.
Seems kind of important not to fall short then.

💡KEY OBSERVATION
Not having enough memory is a container-terminating event.
Memory contention has a more immediate impact on performance or reliability for most workload types than CPU contention does.
Memory Limits
We’re going to dive into how memory limits work first because for memory, limits are simpler requests.
When you set a memory limit in Kubernetes, which is fundamentally a byte value, all the container runtime does is plug that number straight into the memory.max control for the container’s cgroup. Boom. Done.
If the in-use memory for the cgroup exceeds that limit, the OOMKiller will smite it. The container (process/es) that exceeded the limit is the container that will be smitten, and the smiting will be limited to that container. No other container will be harmed in the smiting process. It’s that simple.
Another cgroup setting that helps keep this smiting simple is memory.oom_group.
A “container” is a cgroup, and a cgroup can have more than one process running inside it. The OOMKiller doesn’t technically need to kill all of a container’s processes; it can theoretically just kill one or it can kill several.
In recent Kubernetes versions, the memory.oom_group cgroup v2 control is set to true (or ‘1,’ technically) for each container cgroup. This avoids ambiguity about what the OOMKiller will do when a limit is exceeded: All processes in the container will be killed.
💡KEY OBSERVATION
Memory limits work exactly how you thought they would. Containers that exceed their limits are immediately terminated, every process.
Cgroups and Memory Requests #
Kubernetes does not set any cgroup controls based on memory requests.
Considering that CPU requests have such an elegant and protected allocation outcome, this might feel disappointing.
At the time of writing, a cgroup v2 control exists, which seems like something Kubernetes could theoretically use to establish a baseline memory protection for containers based on their request: memory.low. However, this is not a setting that Kubernetes uses.
While cgroups are used to great effect in guaranteeing CPU time based on Kubernetes CPU requests, they aren’t used for anything when it comes to Kubernetes memory requests. We have to look elsewhere to understand what Kubernetes does to try and protect (or favor) processes using less memory than they requested when memory starts to get tight and the OOMKiller comes calling.
Beware the OOMKiller #
If we’re talking about what happens when memory runs out, we need to make sure we’ve established a level-set on the mythical Linux monster known as the OOMKiller.
The OOMKiller is a Linux kernel feature invoked when a node runs out of physical memory. It’s triggered when a process trying to use memory causes a page fault, but no physical memory is available. Before the OOMKiller departs, it will select at least one process to terminate, freeing up memory that that process had been using.
The process(es) chosen by the OOMKiller may or may not be the same process that triggered the page fault. Given that it’s not safe to assume the page-faulting process will be the process that dies, how do we figure out which process the OOMKiller will choose as its victim?
The details of the OOMKiller’s decision, and how to influence it, underlie how Kubernetes tries to shield and protect “well-behaved” container processes (those using less-than-or-equal-to the memory they request).
Get Ready For Some Math #
The first protection Kubernetes enacts for container memory is that, like with CPU, Kubernetes won’t run any new pods on a node if the sum total of the running container memory requests would add up to more than the node’s allocatable memory. There will always be enough memory on a node to let every container use as much memory as it requested. This is not a direct protection, but a logical one: If all containers use less-than-or-equal-to the amount of memory they request, the OOMKiller should not need to be invoked.
But we all know how hard it is to ensure a container’s memory usage stays under or equal to its memory requests. In the event one or more containers consume more memory than requested, there’s a chance that the OOMKiller will appear.
Here’s how to predict which Kubernetes container processes will be OOMKilled if that happens.
OOM Score
The modern OOMKiller uses a fairly simple algorithm to select which process(es) it will terminate. Every process gets an `oom_score` based on how much memory the process is using. Processes using more memory get higher scores. When the OOMKiller comes calling, the process with the highest score gets terminated first.
You score big 🏆, you lose big ☠️.
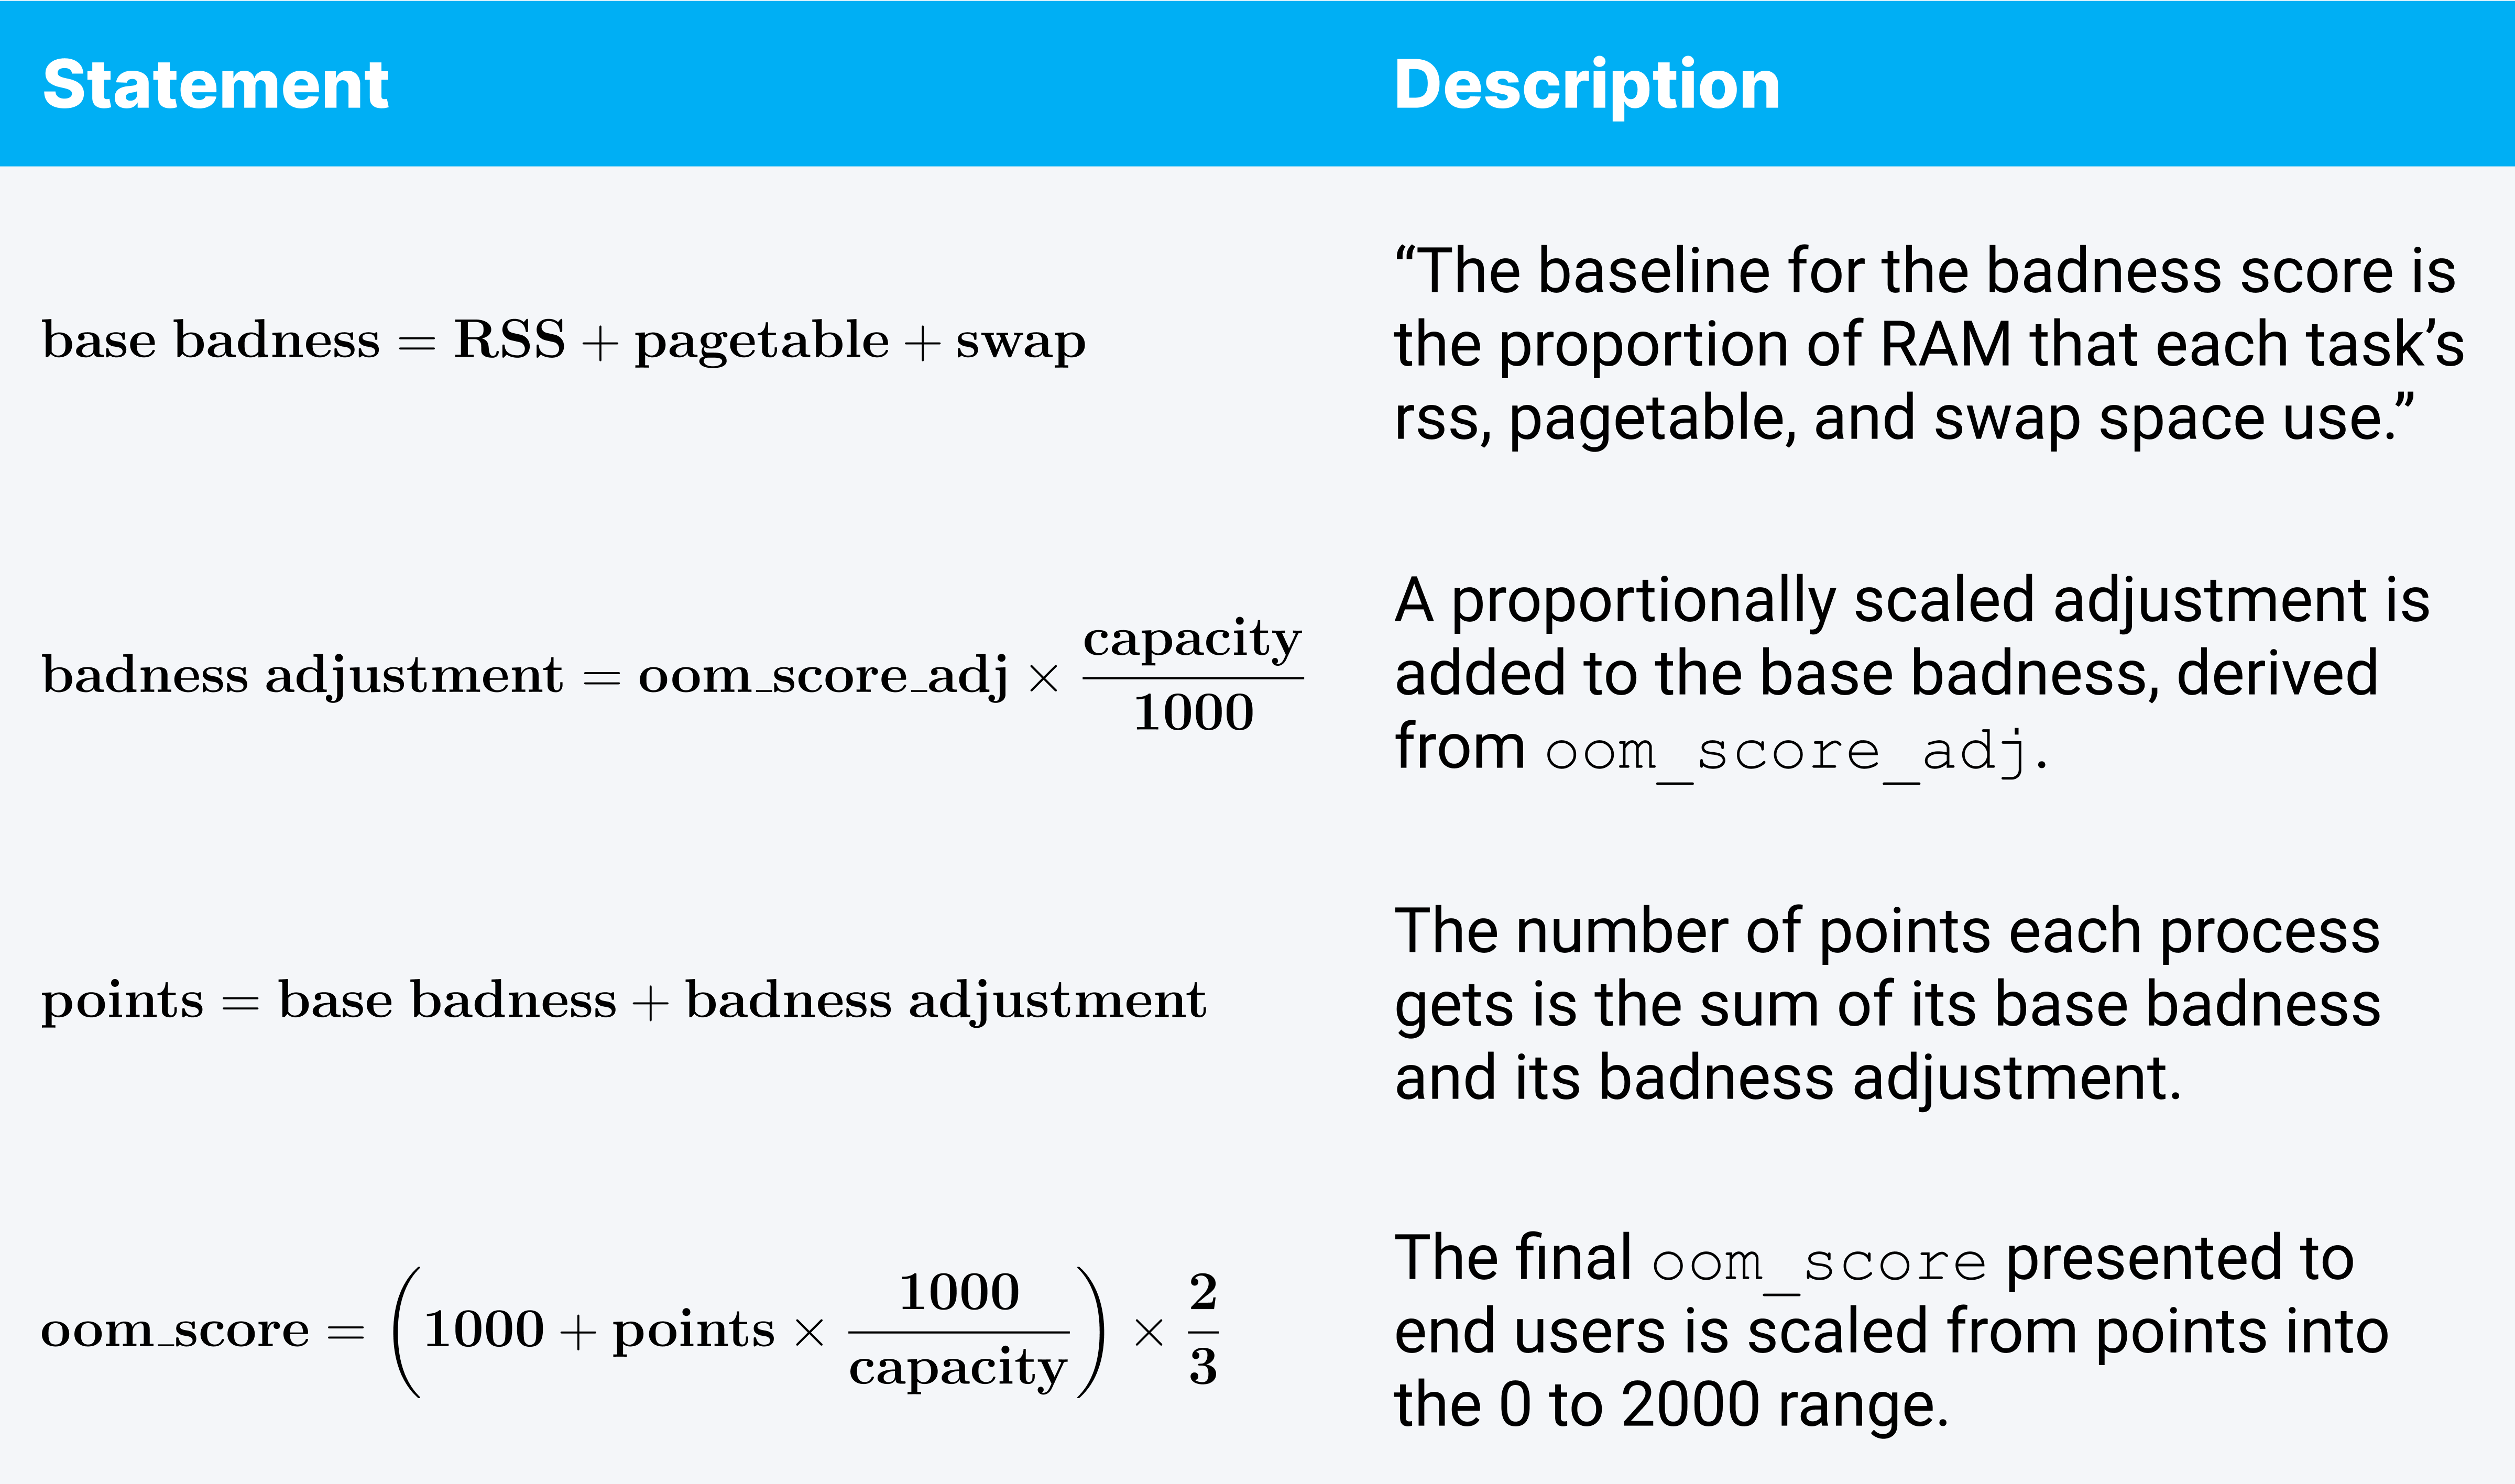
Linux lets users — and Kubernetes — influence a process’s oom_score by setting an oom_score_adj number, ranging from -1000 to 1000. Kubelet sets an oom_score_adj for every container process it starts, and it uses clever math to ensure (with reasonable certainty) that containers using more memory than they requested will always be terminated before well-behaved containers (containers using less than their requests). What it sets is documented. How that math helps us is a little foggier, so here’s an expanded explanation.

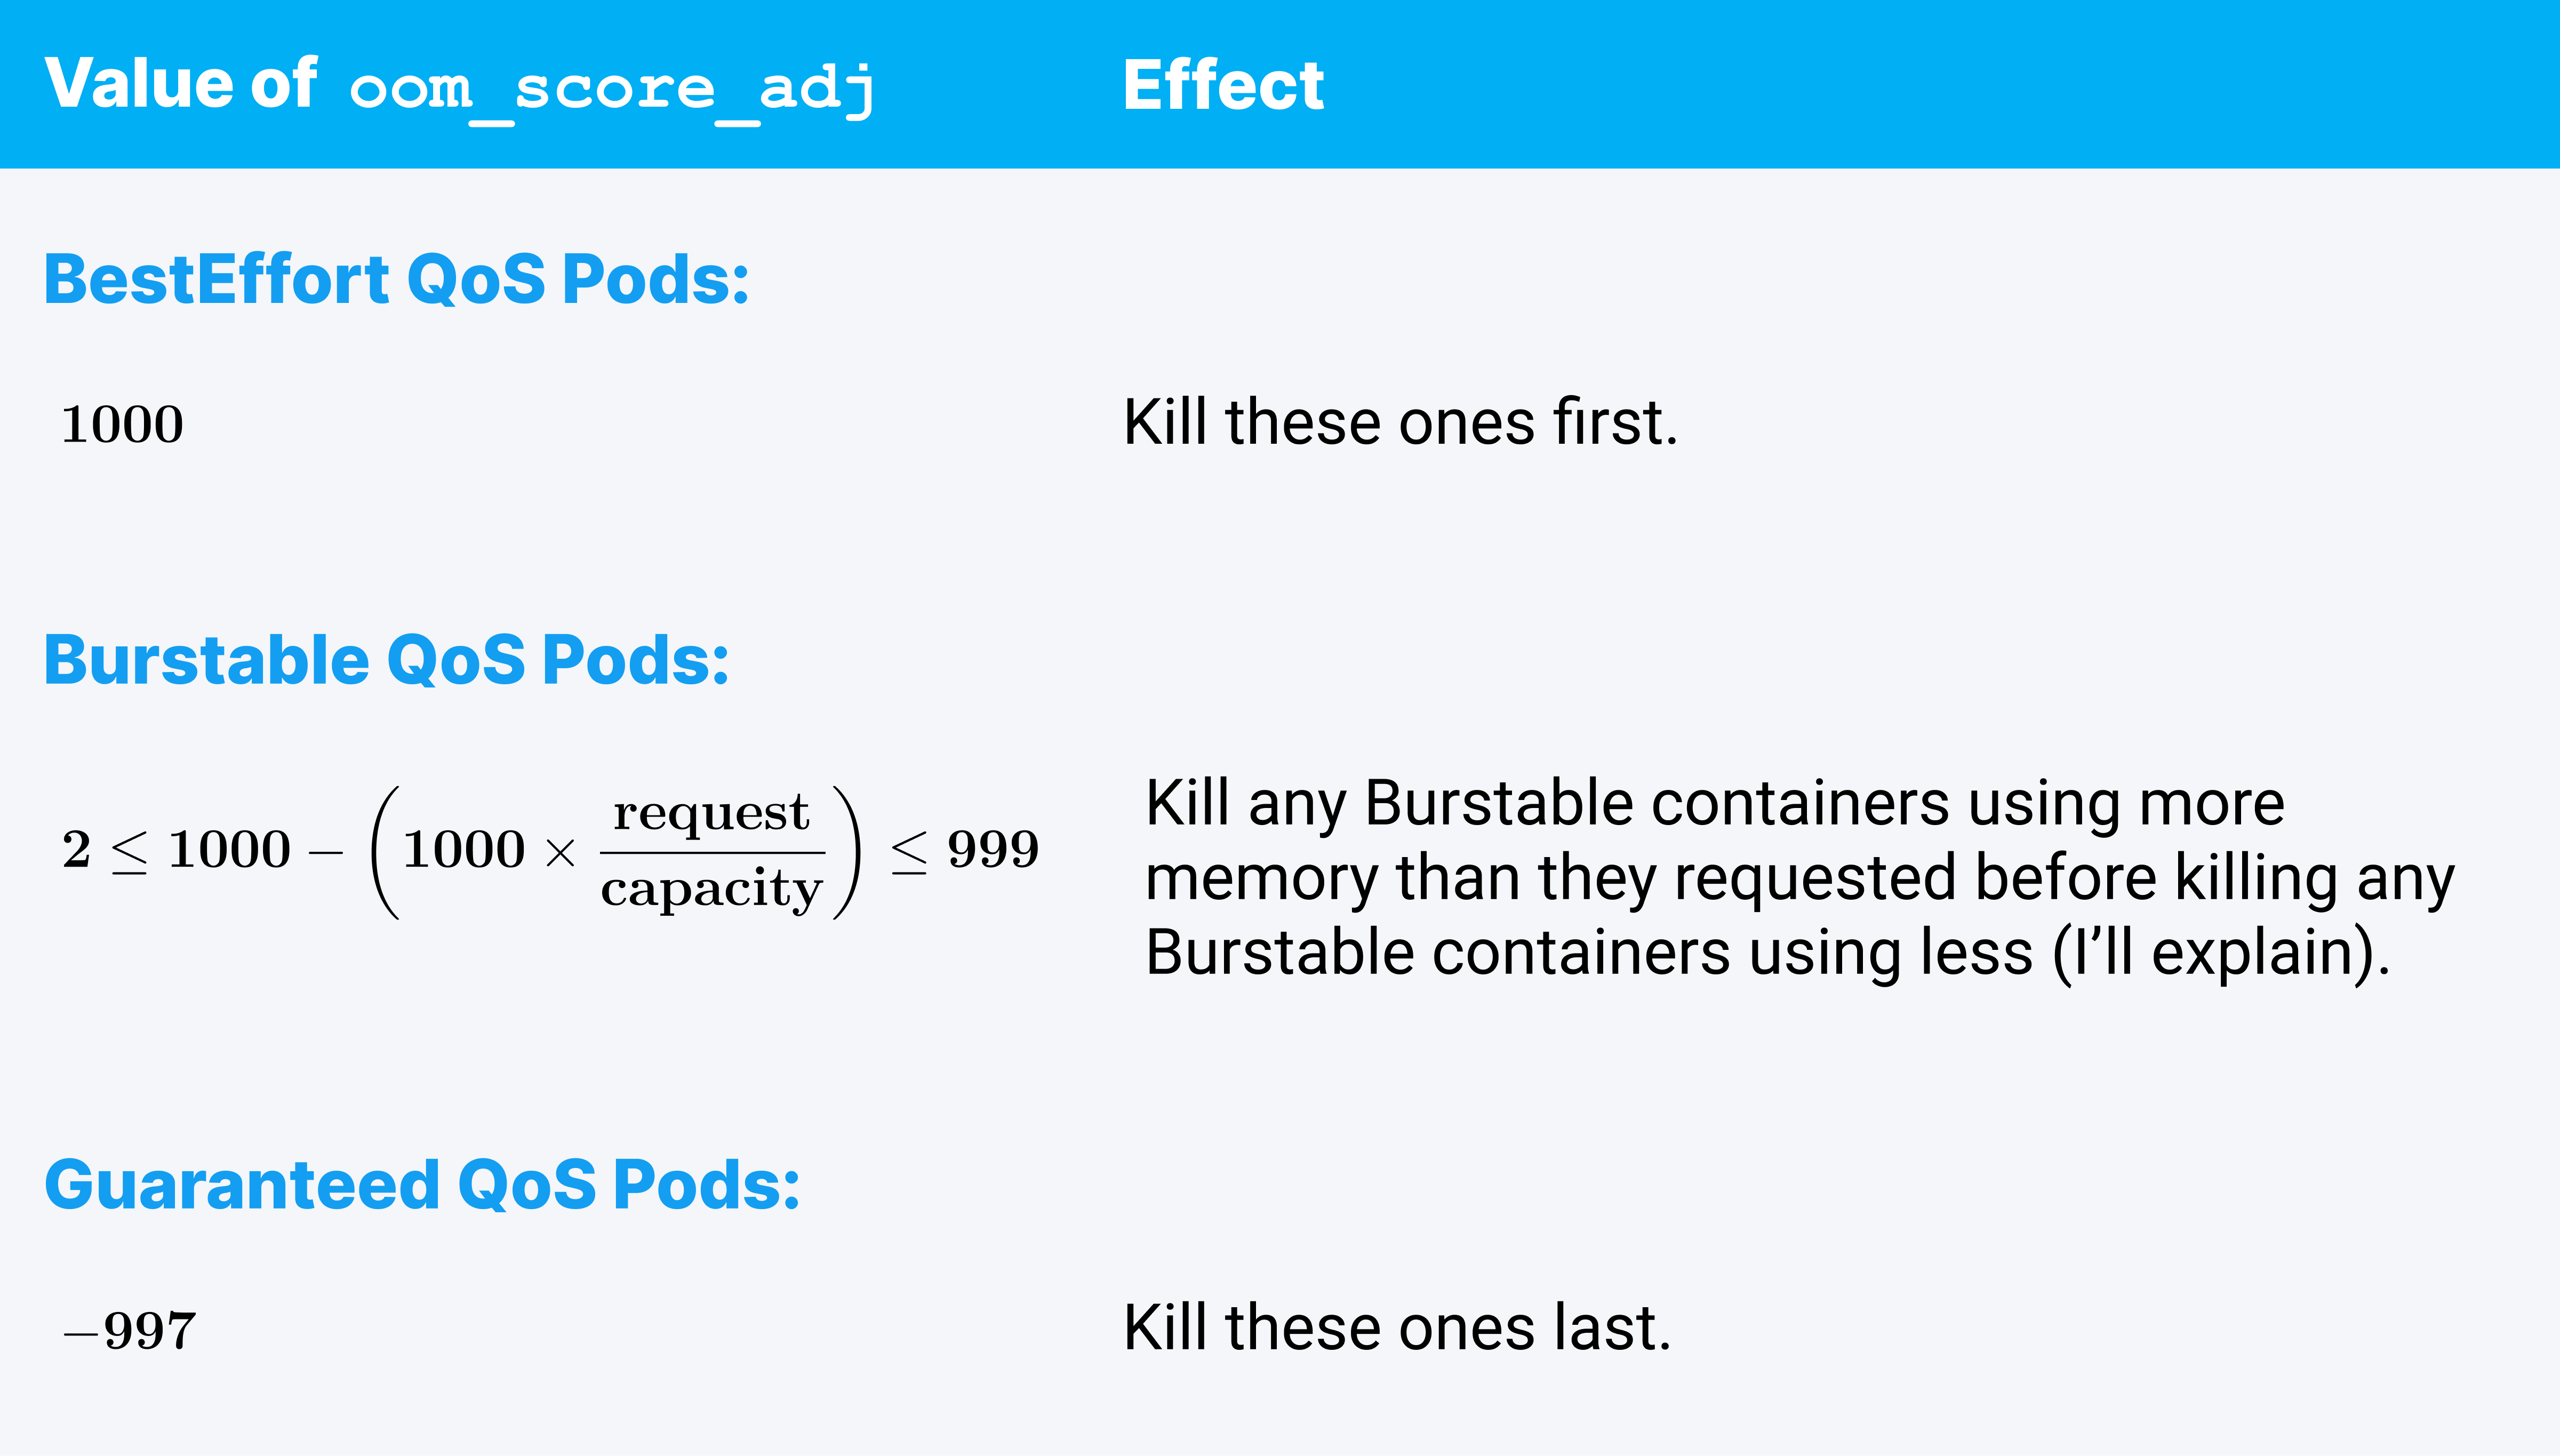
BestEffort pods get an oom_score_adj of 1000, which is basically code for “please kill me.” Being first in line for OOMKilling makes sense; they aren’t accounted for during pod scheduling, so if anything is wrong, they should get the ax.
An oom_score_adj of -997, on the other hand, set on all Guaranteed QoS containers, equates to near invincibility from the system OOMKiller. Almost everything else will get killed before Guaranteed QoS containers. This also makes sense because Guaranteed QoS containers are always instantly killed when they exceed their own requests, regardless of the system capacity; they shouldn't need to be targeted by the system OOMKiller.
For Burstable QoS though, the effect of this equation, how it works and how reliable it is at protecting well-behaved processes is hard to pin down without getting really particular about exactly how oom_score and oom_score_adj work. In the end, it’s fair to say that oom_score_adj values set using this equation work really well at making sure Burstable containers that use more memory than they requested get killed before any Burstable containers that use less.
But How?
OOM scores range from 0 to 2000 and are based on how much of the node’s memory a process is using. The oom_score_adj value can force a process to be scored as if it were always using an additional percentage of node memory beyond its actual usage.
Examples:
- A value of 250 will cause the process to be scored as if it were using additional memory equivalent to 25% of the node’s capacity.
- A value of 1000 (the maximum) will cause the process to be scored as if it were using additional memory equal to 100% of the node’s capacity.
For the math-minded among us, the calculation details are as follows.

Fun trivia: Because of the scaling factor applied, the de facto OOM score of a new process using an insignificant amount of memory works out to be 666. If you have a lot of processes on your system with an oom_score of 666 don’t worry: That’s totally normal, not a sign of the Armageddon.
Recall that for Burstable pods, Kubernetes sets the oom_score_adj to:

What does this do?
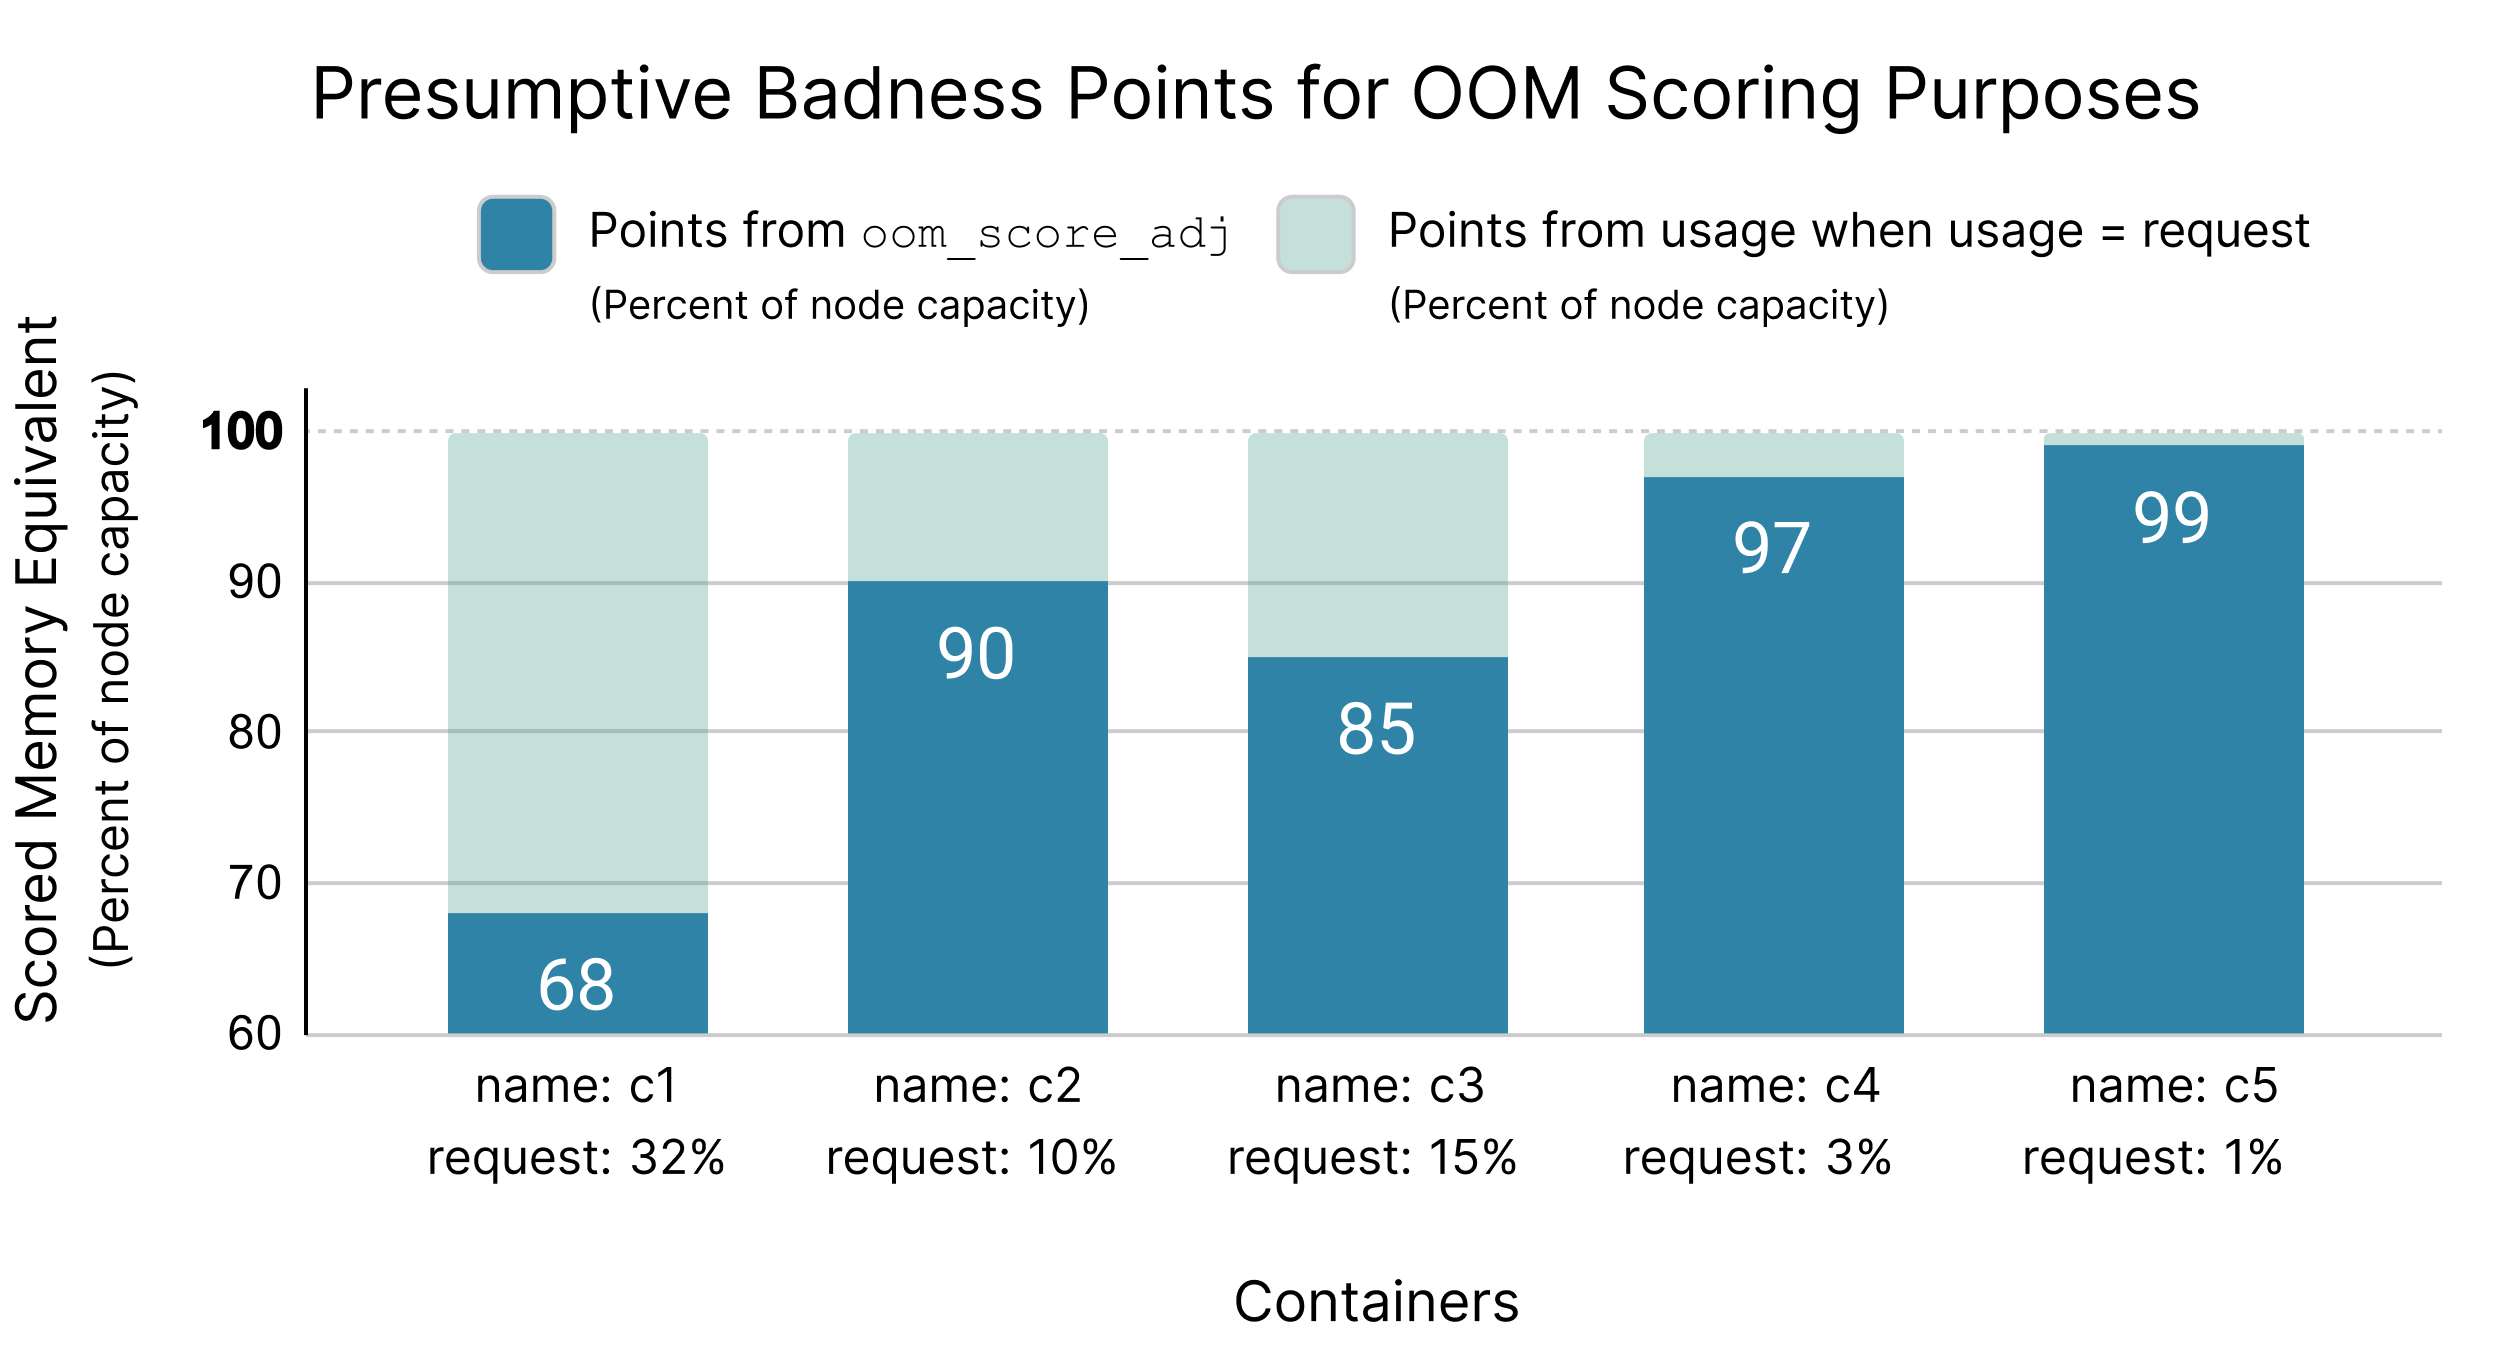
By simple example: if a container requests 3% of the node’s memory capacity, Kubernetes sets the oom_score_adj value to 97% (970). If a container requests 32% of the node’s capacity, Kubernetes sets the oom_score_adj value to 68% (680).
In a nutshell, this calculation for setting oom_score_adj normalizes the scored memory equivalent for all Burstable containers such that if every container uses exactly the memory it requested, then every container will have exactly the same oom_score.
The following diagram illustrates memory requests and OOM score points as percentages of node capacity (instead of bytes) to demonstrate how the oom_score normalization scheme works.

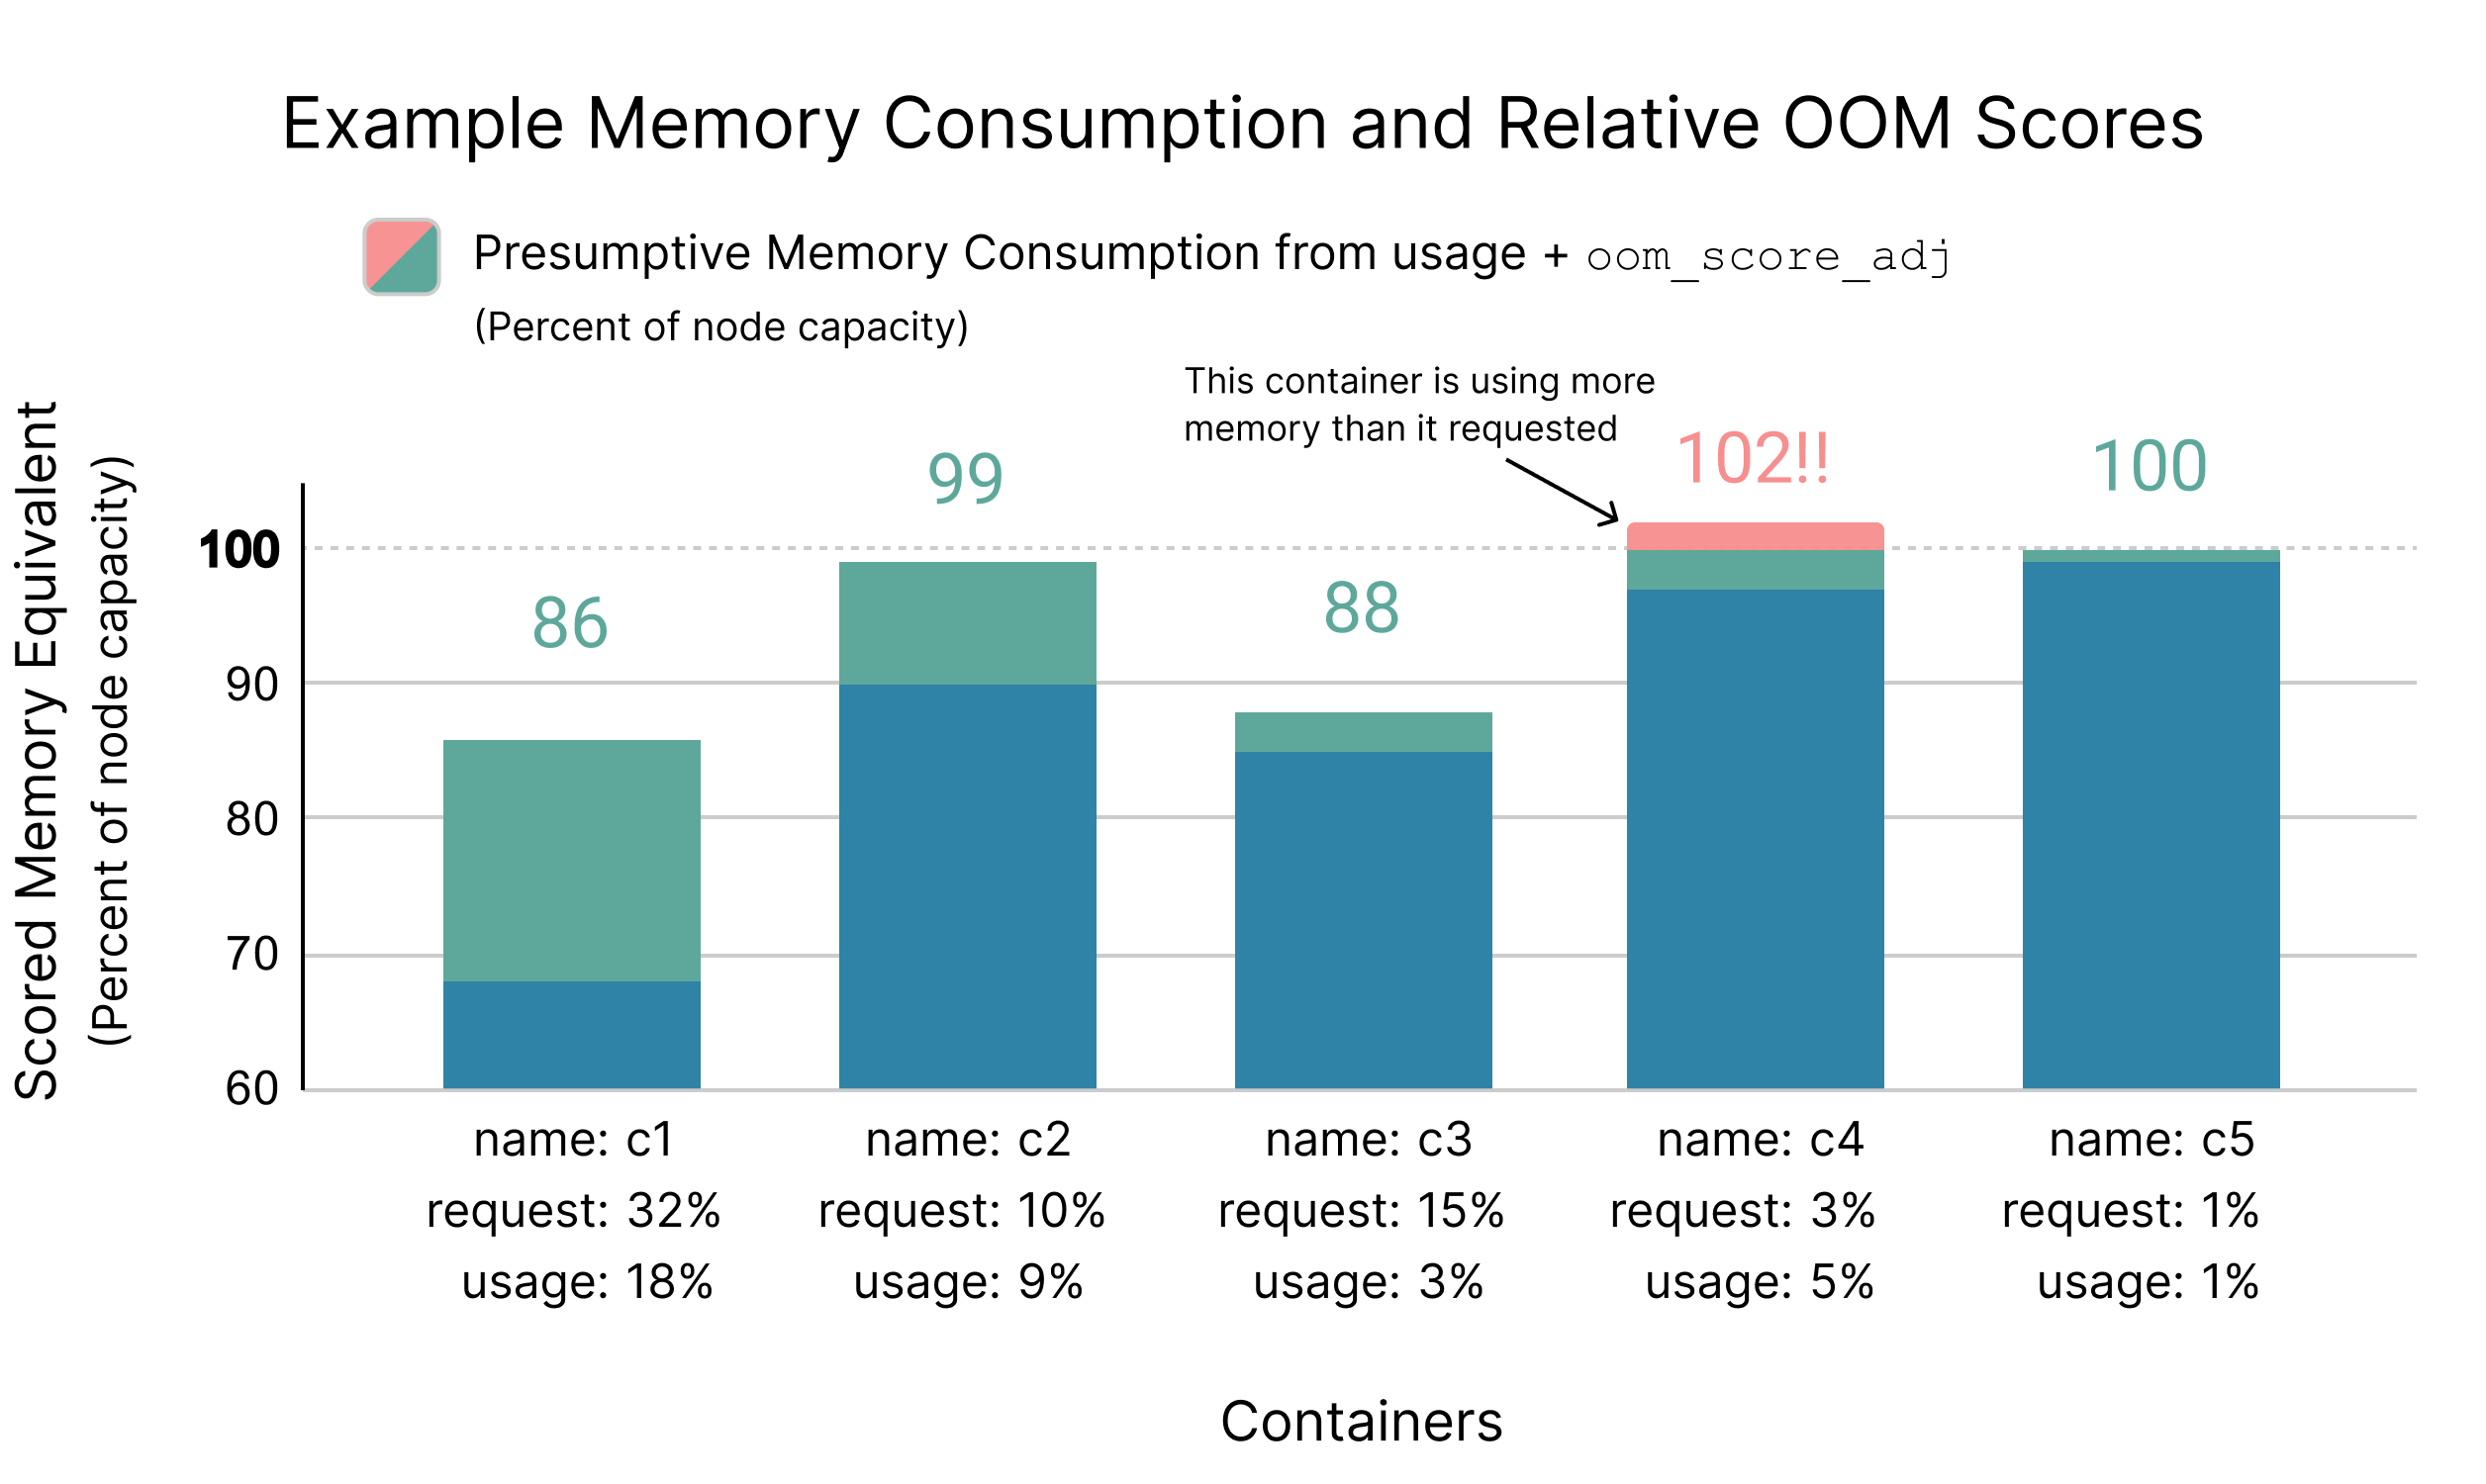
Any Burstable container that uses more memory than it requested, regardless of how large or small that container is, will have an oom_score larger than this normalized “full request usage” value. Therefore, any container using more memory than it requested will have a higher oom_score than all containers that use less than or equal to their memory request.
The following diagram demonstrates how a small container, using relatively little memory, but still more than it requested, will get a higher oom_score than any other container in the Burstable QoS class.

This oom_score_adj trick isn’t as tidy and easy to understand as a cgroup control like memory.low might be, and its precision is limited by the resolution at which oom_score_adj can be set; however, it’s a pretty dang reasonable implementation in terms of protecting containers from the system OOMKiller, so long as their memory usage is within the requested value.
💡KEY OBSERVATION
There is a reasonable assurance that when a node runs out of memory and the system OOMKiller is invoked, containers using more memory than requested will be terminated first.
Containers using memory less than or equal to what they requested on a Kubernetes node are unlikely to be terminated by the OOMKiller. However, this protection is neither exact, nor fully guaranteed.
It’s nice to know that Kubernetes does a decent job of protecting processes if they use less than they request. However, it’s important to remember what we started with before closing out: Memory contention is a do-or-die situation. Making a reasonable decision about which process to kill when something needs to be killed is great, but ideally, we want to avoid having to ever make that decision in the first place.
The Journey Continues: Node Pressure Eviction #
Implementing both CPU and memory requests and limits is largely an upfront setup task, performed by kubelet and the container runtime, converting numbers from the resources abstraction into cgroup and Linux process settings. Linux itself is then responsible for runtime enforcement, while Kubernetes (the orchestrator) takes a back seat.
Kubelet isn’t fully out of the game though. When Linux seems to be struggling, Kubelet will come back into the picture and try to help sort things out. We’ll take a look at how that works in the next chapter, and summarize all of the key observations we’ve made in the series’ next and final chapter.